Wednesday 30 May 2018

Japanese Anti-Submarine Aircraft in the Pacific War


An official video preview of this forthcoming book by Ryusuke Ishiguro and Tadeusz Januszewski from Mushroom Model Publications (MMP Books) is now available online:-


. . . and excellent it looks too! As well as enlightenment there is plenty of inspiration for some new mainstream kits and decals. The Kokusai Ki-76, Aichi H9A and Kyushu K11W are long overdue.

Image credit © 2017/18 MMP Books

Saturday 26 May 2018

Jan Hajicek's 1/48 Mitsubishi Type 96 Kansen Model 2-2 Early 'Claude'


The second model Jan Hajicek has kindly shared here following his return to modelling is Fine Molds 1/48 Mitsubishi A5M2b. In his own words:-

"I’d like to present the most unpopular version of the beautiful Claude. It was the most unpopular because pilots at the end of the 1930s preferred to feel the air stream in open cockpits. When Mitsubishi Type 96 Kansen Model 2-2 with an enclosed canopy was in 1937 (Showa 97) accepted by the Nihon Kaigun in 1937 (Showa 97), the new enclosed canopy was criticised for limiting visibility during combat The pilots of several units had the sliding hood removed from their aircraft. A total of 124 machines with enclosed cockpits were produced, followed by a modified version which  featured only the windscreen without the rear glazing and sliding hood. 


"I chose to model the machine that served with the Hyakurihara Kokutai in Ibaragi Prefecture just at the turn of 1941/42. This machine is recored in two photographs which show some interesting features. The cowling, even after several years, is still gleaming like a mirror and has only few scratches around the fasteners. All Hinomaru and tail planes that were sprayed with the same colour are glossy, too. 


"The rest of the machine appears to have been treated with aluminium anticorrosive dope that after some time had lost its shine and degraded towards a greyish hue. The use of protective anticorrosive lacquer (which had been applied from the A5M2b late version) seems doubtful for this machine and even for most A5M2b early machines. As with most naval machines operating from land bases, this one has had the arrestor hook removed. As one of the few visually recorded machines with the sliding hood it does not carry an external fuel tank. These 160 litre fuel tanks were smaller compared to the more commonly used 210 litre tanks introduced with the late production A5M2b. 


"The kit was built straight from the box without any accessories or other enhancements. Although the Fine Molds kit allows the flaps to be shown lowered I chose to leave them closed. As already mentioned, the model is not fitted with the external fuel tank. The main reason is that I plan to build more Claudes with fuel tanks fitted but also because the kit includes only the 210 litre tanks that would have to be modified, hence my model would not have been built straight from the box. The assembly of the cockpit was one of the most trouble free that I have ever experienced, and there was no need of dry fitting or adjustments. Overall, the fit of kit parts is excellent as to be expected from one of the best toolmasters in the World. Those who appreciate Fine Molds Nano Dread series for 1/700 scale ship models or the newly released machine guns in 1/72 scale would definitely agree with me. By the way, the cowling with engine is just slotted onto the plug on the fuselage without glue 


"The model was sprayed with Alclad matt aluminium. The other paints used were Vallejo, Lifecolor, and my preferred Tamiya clear colours for the formation lights. All Hinomaru, tail codes and propeller markings were sprayed using masks, the only decals used were the stencils and data plates. Weathering was done using MiG products and artist pastel chalks. The objective was to have fun building the kit and to achieve my own idea of how it should look compared to the relatively well maintained aluminium coated aircraft."


As for the Ki-61, Jan has produced Dead Design canopy masks for all the Fine Molds A5M kits (including the 1990s released A5M1, 2a early, 2a late and also for the A5M2b early as modelled here) which include wheel and wingtop light masks. Jan does not hold a large stock of masks in his webshop as he does not wish the tape to deteriorate in storage, hence the 'Freshly Cut' logo on his packaging.   


With special thanks to Jan for sharing these images and his build report on a Claude variant which is not unpopular with me, as well as the information about his specialist range of painting masks. 


 Image credits: All model photos and product images © 2018 Jan Hajicek & Dead Design; Box art © 2017/18 Fine Molds Corp.

Thursday 24 May 2018

Jan Hajicek's 1/48 Kawasaki Ki-61-I Tei Special Attacker


Jan Hajicek,  the mastermind behind the Dead Design range of masking products, has kindly shared these images of his Kawasaki Ki-61 I Tei built from the Hasegawa 1/48 scale kit and representing an aircraft of 160 Shinbu-Tai at Chofu air base in August 1945. In Jan's own words:

"I finally managed to finish a model that had lain on my shelf of doom for 20 years. I had purchased the kit and FAOW book in 1995 at the Collinsdale Hannants during a trip to Scotland. Back home I purchased the Aires cockpit, but on attempting to install it I realised that it didn’t fit at all. This experience frustrated me so much that the kit went back into the box and waited almost 20 years. I dusted it off two years ago, assembled the main parts, applied surface primer and finally finished it last autumn.


"Eventually I chose to complete it as 160th Shinbu-tai machine. That special attack unit was formed in April 1945 at Chofu from the 244th Sentai and this well known machine was most likely left behind at the air base due to engine or some other failure. I like the heavily weathered appearance. 


"In addition to a replaced front lower cowling panel, the washed off or removed white home defence bands around the Hinomaru are interesting. A careful study of the b/w photo of thios machine revealed that the white colour appeared to be washed off. That seemed similar to Luftwaffe washable winter white camouflage. But that is speculation on my part, not a fact.


"The kit was built more or less like a hybrid. At different stages over the past two decades my view of the assembly changed several times. For example the cockpit was built straight from the box, with photo-etched seat harness, Ho-5 cannons from CMK. I added photo-etched trim wheels and push rods, and re-modelled the wing racks and external fuel tank The 250 kg bomb came from spares, whilst the antenna wire is Uschi VDR. The antenna insulator, cowling fasteners, landing light cover and all formation lights were scratch built. 


"My own masks were used for the canopy, inspection covers and all markings. The fuselage artwork was a Lifelike decal (# 48-005R 244th Sentai Part 3, Aircraft subject # 4). Paints used were Gunze for the propeller, Alclad on the lower surfaces and Vallejo for the rest. Weathering was applied using MiG, Windsor & Newton acrylics and artist pastel chalks."


Jan, who spent five years working as a designer for Eduard and then 10 years as a designer, webmaster and translator for MPM/Special Hobby, has recently begun marketing his own range of masking accessories under the Dead Design logo. During his career he has designed hundreds of photo-etch sets, decals, masks and colour instructions for kits, distinguished by his own 'Dead Design' signature. Jan's perspective is that every aftermarket accessory must help the modeller, either by enhancing detail or by saving time.


With that in mind he has developed excellent masking sets for the recent Tamiya 1/48 and 1/72 Ki-61 kits, including a comprehensive set of inspection panel cover masks designed to facilitate applying different shades of natural metal, as well as canopy masks and masks to paint the Hinomaru. The Dead Design range now consists of 30 sets of masking accessories, mainly canopy masks for Japanese aircraft subjects, with more planned to include inspection covers and canopy masks for early 1950s jets, as well as more WW2 subjects with photo-etched parts and decals. Jan's products can be purchased direct from his own webshop at www.deaddesignmodels.com   


With special thanks to Jan for sharing the images of his splendid model and the news about his range of fine accessories.  

Image credits: All model and accessory images © 2018 Jan Hajicek & Dead Design; Colorised photo-image via web, from an original photo taken by USMC photographer Joe O'Donnell and published in 'Japan 1945, Images From The Trunk' (ISBN 4-09-563013-2) by Shogakukan Inc., 1995.

Monday 21 May 2018

Combat Colours No 9 The Mitsubishi Zero ~ Errata & Additions


Combat Colours No 9 The Mitsubishi Zero Type 0 Carrier Fighter (A6M) "Zeke" in World War Two
Errata & Additions

Page 3 - Photo - incorrectly duplicated caption from photo on page 2. The caption on page 3 should read as follows:-


"The first A6M2 captured in China in November 1941 was one of two from the Tainan Ku detachment of the 22nd Air Flotilla Fighter Unit which force landed in bad weather on the Luichow Penisula."


Page 4 - Colour Chart 1. As printed the colours are distorted. Please contact the author by email to request a PDF version of this chart (free of charge) showing the correct colours.


Page 7 - Wing Schematic. The outboard red stencil line on the flap is incorrect. The flap was outlined red on the inboard, front and rear edges only. This also applies to the profile plan views.


Page 9 - Colour Chart 2.  As printed the colours are distorted. Please contact the author by email to request a PDF version of this chart (free of charge) showing the correct colours.


Pages 11/ 12 - Text as published: "The operational requirements for a longer range were then incorporated into the improved engine design with a reversion to the original longer wing (but without folding tips) to accommodate additional fuel tanks in the outer section and aileron balancing tabs to reduce the control forces on the longer aileron". In fact the A6M3 Model 22 retained the folding wingtips. Even some Model 32 retained part of the folding mechanism inside the wing structure such as the handle bar and associated access hatch. I am grateful to Ronnie Olsthoorn for this confirmation.


Page 14 - Upper Photo. A6M2 V-110 was not shot down. PO3c Maeda of Tainan Ku ran out of fuel after becoming lost in pursuit of a B-25 from Lae and force landed this Zero on the beach at Otamata Plantation near Marshall Lagoon on the south coast of New Guinea about 80 miles from Port Moresby. He was made POW by Australian forces and survived the war. The rudder fabric was described as having a pale green (similar to RAF Sky) dope applied, over which it had been re-finished with a grey dope common to the rest of the airframe. I am most grateful to Bob Alford and Bob Piper for an interesting discussion of this incident and others.


Page 16 - Profile T2 190. This aircraft was not being flown by Yanagiya during the 18 April 1942 Yamamoto escort mission as stated. Yanagiya was flying T2 169 that day.

Page 20 - Profile 2-2-103. Presumed to be a Nakajima-built aircraft and the airframe colour shown as such, but the presence of the expected white border around the fuselage hinomaru could not be confirmed. This aircraft has been variously depicted with and without the white border which might have been painted out. 

Page 25 - Profile UI-105. It is questionable whether this aircraft, long attributed to Nishizawa, was actually being flown by him in the series of well known photographs taken by Hajime Yoshida, a Nichiei journalist who visited Rabaul, Lae, Buin and Ballale during 1942-43. It is not identified as such in Yoshida's autobiography 'Samurai Reisen Kisha' and as he had become friendly with Nishizawa it seems improbable that he would not have mentioned him if he had been the pilot flying his A6M3 Model 22 Zero up close to the G4M bomber in which Yoshida was riding. I am grateful to Osamu Tagaya for this discussion.

Page 26 - Profile 108. The upper surface camouflage dark green should extend over the whole yellow of the IFF strips on top of the wing in similar manner to the outer strips on UI-015.  


Page 31 - Profile B1-05. The non-standard camouflage demarcation of this aircraft should have been noted.


Page 32 - Profile Ta Ku-101. The caption should read as follows:- 

"Nakajima A6M2-N of Takuma Ku, Japan in August 1943. This heavily weathered Rufe reveals the original amber-grey factory scheme and red-oxide primer beneath its very worn dark green camouflage."


Page 36 - Upper Photo. As for Page 25 re Nishizawa attribution. 

Image credit:- © 2017 Guideline Publications

Monday 14 May 2018

Jim Anderson's 1/72 RS Models 'Norm'


Through the good offices of Aviation of Japan's Texas correspondent Mark Smith, fellow Texas modeler Jim Anderson has very kindly shared images and his build notes for this splendid model made from the RS Models Kawanishi E15K1 'Shiun' kit  # 92075 from 2010 in 1/72 scale:-

Building RS Models E15K1 Shiun in 1/72 Scale
by Jim Anderson

"RS Models are short run injection plastic models of lesser known aircraft types.  This kit was started in early August 2015 and was completed in two months.  It was the first RS Models kit that I’ve built and is easily the best offering to date of this unusual and complex seaplane which was code named “Norm” by the Allies during WW2.  RS Models also offers the later production version of the Norm as a separate kit (# 92076).  


The 'Shiun' (紫雲 - Violet Cloud; Ed.: "the purple clouds on which Amida Buddha rides to welcome the spirits of the dead") was built by Kawanishi Kokuki K. K. and was large for a single engine floatplane with a wingspan of 46 feet and a length of just over 38 feet.  


Only 15 of the type were produced including prototypes and the project was terminated during 1944 due to recurring problems with the contra-rotating propellers and pair of troublesome retractable/inflatable outrigger floats.  All these lead to difficulties in handling, performance and maintenance.  Six aircraft were sent to Palau island in the combat theatre but all were shot down by Allied fighters.  One, or possibly two, aircraft were assigned to the IJN light cruiser Ôyodo for evaluation but I don't know their fate.


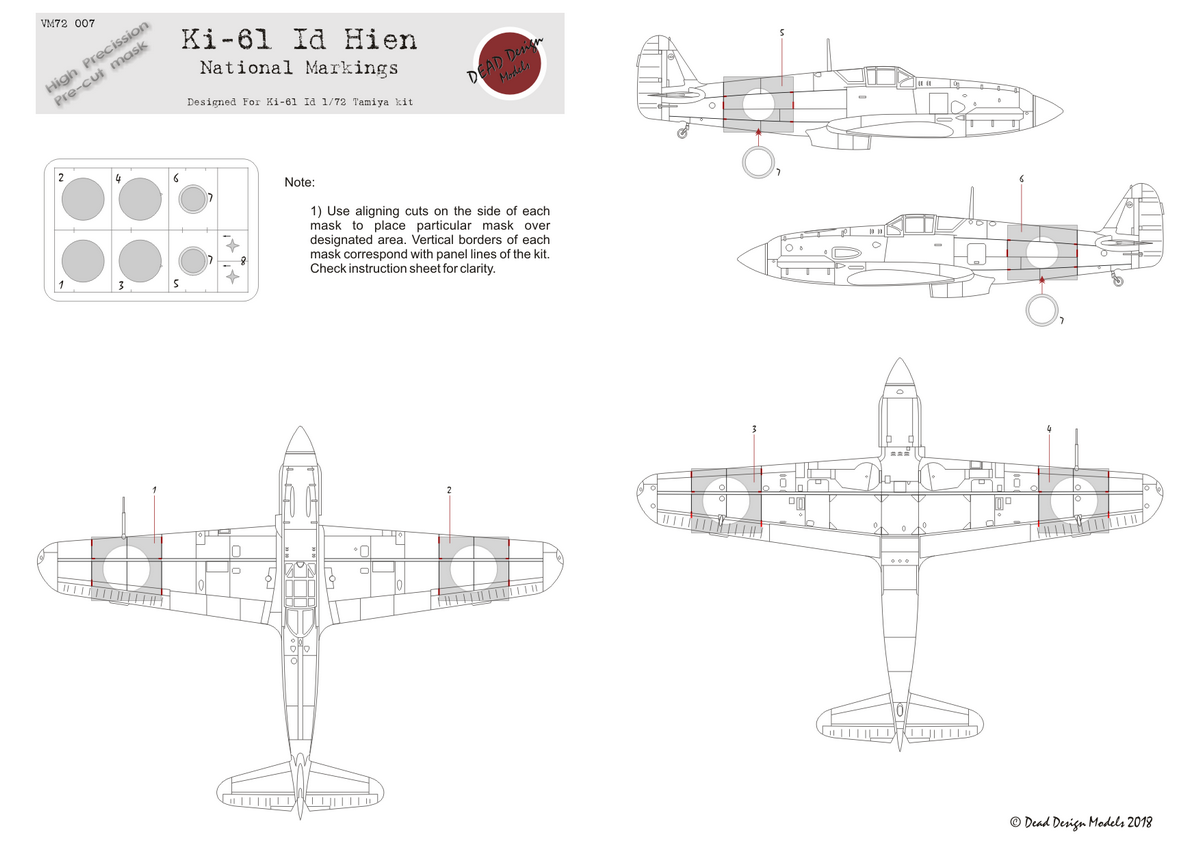
The box art depicts an illustration of the orange prototype.  The reverse side shows two colour schemes and their respective markings.  Decals were provided for both versions and went on well.  The orange version is the first Kawanishi prototype circa 1942 and the second version, which I chose, is from the Kawanishi Air Technical Arsenal circa 1943 and depicts an attractive overall light gray machine with a black cowling. (Ed.: Good choice as the prototype was probably painted alumnium rather than orange!


There were about 35 injected molded parts in the kit including a decent clear one piece injection canopy and a beaching trolley.  Parts were crisp with adequate detail overall and a good fit.  I don’t recall there being any photo etch parts.  Recessed panel lines, nice ailerons and control surfaces with well executed taper and thinness on all of the trailing edges of the wings and rudder were first class.  Although not as high quality as the more mainstream manufactures, the RS Models kit is well within the capability of the average modeler.  


I chose to make two modifications to the kit during the build.  As I recall, the first was to add a 3/32” brass shaft to replace the plastic shaft for the propeller assembly.  I wanted to try and make the propellers counter rotate as on the real aircraft.  I had hoped that they would spin in different directions with a puff of wind and look really Neat-O! Didn’t work!  But they can still be positioned easily with a touch.  


The other modification was to remove the excess plastic from the interior side of the engine cowling where the engraved cooling flaps were located.  I used a Dremel tool with a cone sander followed by some sandpaper to achieve a scale thinness.  Each flap was then in turn cut from one another with a razor saw being sure to leave each one attached to the cowling base.  When this was finished, I used needle-nosed pliers with masking tape added to the tips in order to slightly bend each flap outwards.  It’s the nose of this beast with its big spinner and large cowling that gives it a distinctive and powerful look. 


I also added a piece of lead about 1” long by 1/4" wide to the forward interior of the main float when it was glued together having a concern that it would be too tail heavy even for the trolley.  The kit supplied just the basic outline of the area where the outrigger pontoons were stowed in flight with a shallow rectangular shaped opening void of detail.  I added a few pieces of bracing and a round access hatch made of plastic.  There were a couple of photo etch vents from the spares box that made their way into the construction and it was then painted. The rest of the build followed the instructions.


For painting, I take notes on what colours I use and mixing ratios.  Enamels are my standard choice of paint, but I will occasionally use an acrylic or two.  The interior color is 75% Floquil RR44 Depot Olive and 25% Floquil RR87 Depot Buff.  This color was also used under the wing  where the outrigger pontoons fold back into their recess.  The spinner is Testors 1/4 oz. bottle of Gloss Brown #1140 with a few drops of white and yellow added to the color cup.  


The beaching trolley was AeroMaster RLM 81 Braunviolett #9028.  Overall color was a 50/50 mix of AeroMaster RLM 02 Grau #9020 with Pactra Gray 1I34 from their Authentic International Colors Italian AF set from way back in the 1970s (it basically looks like US Gull Gray).  A few drops of lacquer thinner were added to this paint as it was a little thick in the bottle.  The cowling was Testors Gloss Black with about 20% Humbrol HU15 (a medium purplish blue) added to the black portion. 


After painting the model and sealing it with Future floor care, each outrigger pontoon received a rough brushing of thinned Model Masters US Army Helo Drab FS 34031 on their upper surfaces to replicate the collapsible material they were made of.  I like to build seaplanes during the hot months here as a form of mental projection allowing me to visualize something cooler than the beat down of the 100 degree plus heat of a Texas summer.  I call these builds “Seaplane Summer”; and let’s just face it, seaplanes are already cool by themselves!" 

 Norm's size makes an interesting comparison with Jim's equally splendid Rufe

Cool indeed - and inspiring! With a very special thank you to Jim for sharing all this delight and to Mark for facilitating it.  More please!


Image credits: All model pics © 2018 Jim Anderson; Box art © 2010 RS Models; E15K1 photo via Wiki