Monday 28 November 2011

Japanese Armour Colours Primer - Advance Notice


Although slightly off-topic for this blog the Primer for Japanese Armour Colours will be available when the sidebar link goes up shortly.

Format is similar to the Zero e-guide. 20-page PDF in A4 format covering:-


Official Japanese Army colour names and descriptions
Official Japanese Army Camouflage Instructions
Camouflage schematics illustrating use of colours
Analysis of GSI Creos Tank Color paints with measured colour chips and comparisons in Munsell, FS 595B. RAL & Methuen
Japanese Army Khaki with colour chip
Colour Photo Section
Hobby Paints


Image credit: © 'Straggler' 2011

Wednesday 23 November 2011

Ernest Pazmany's Pearl Harbor B5N2 "Kate" in 1/48th scale

It is a great pleasure to be able to display these images of Ernest Pazmany's superb 1/48th model of the Nakajima B5N2. Ernest began this project in late September 2007 using the Hasegawa wing-fold version of the Fuchida "Kate" with parts for the 250 kilogram bombs taken from the "Pearl Harbor Bombardment Command" version of the same kit.

Ernest used a variety of paints but mainly enamels, with a fairly dark green inside the cockpit based on photographs. The main colour is White Ensign Models Colour Coats Nakajima Amber Grey (Ameiro) ACJ17 lightened in places for subtle tonal variations. Ernest has been fascinated by the 'I-3'/amber grey paint for years and wanted to try it on a Shokaku based bird. The green dappling was added with Floquil RLM 73 and also varied in tone. Ernest noted that the application of the green varied from heavy to light on different aircraft. On the model the original glossy finish is represented as a matte to semi-matte for personal preference only.


All markings were painted except for the numbers, torpedo lines on cowl and tail code with Aeromaster decals used for the latter. The wing walks were painted in various shades of grey black. Ernest will probably add a little more weathering in future but he is not a fan of heavily weathered models. 


The rudder and tail control surfaces were cut and repositioned on the model with an Eduard tail wheel trolley attached. The bomb cart is a Fine Molds casting (no longer available) with one of the two bombs riding it. The carrier deck shows Shokaku line patterns as taken from photos of the ship. The planking was painted in varied shades of grey, yellow grey, tan, etc., as Ernest wanted to depict a  wood deck weathered by the elements. Ernest plans to add more weathering and smudge work so that it has a more used look in the future and also plans to add two or three figures down the line. With completion of this model Ernest says he is now ready for an OOB project!  


Image credits:- All © 2011 Ernest Pazmany

Friday 18 November 2011

New Tamiya A6M5 in 1/72nd Scale!


It looks like Tamiya are joining the ranks of those offering new mold Zero fighter kits in the one true scale with a new 1/72nd scale kit of the A6M5. The kit will be available in February 2012 although some Japanese mail order outlets are already accepting pre-orders. It will retail for around 1,400¥ (about £11.50 or US$18) although HLJ are offering it on pre-order for 1,200¥ (about £9.99 or US$15.60). This, together with the description "affordable" in the Tamiya blurb, suggests it is being marketed in direct competition to the Fine Molds "magazine instalment" A6M5 @ 3,048¥ (about £25 or US$40).

Tamiya already have some very fine 1/72nd scale aircraft kits in their catalogue so this is welcome news. Let's hope a scaled down version of their beautiful Type 22 follows!

Hat tip to Jeff Groves for the heads up, thanks.

Image credit: © 2011 Tamiya Inc., via Hobby Search 1999

Saturday 12 November 2011

Airfix 2012 Club Membership Kit - 1/48 JAAF 109E


The Airfix Club 2012 Membership limited edition kit included with every subscription is their excellent new 1/48th scale Messerschmitt Bf-109E3/E7 but with special markings options for a captured machine flown by the RAF and for an aircraft imported and flown by the Japanese Army.


Two Bf-109E aircraft were imported by Japan and test flown by the JAAF although three were originally contracted for purchase. They are usually described as being E7 type but were actually E4 type. When the kit becomes available I'll post more detailed information about the JAAF 109's including their colour schemes.

Image credit: © 2011 Hornby Hobbies Ltd

Tuesday 8 November 2011

Troy Smith's Tamiya 1/48th Hayate

Troy Smith has kindly shared these images of his splendid model of the Nakajima Ki-84 Hayate built from the Tamiya 1/48th scale kit together with a story. The kit was built almost OOB in 1991 after a ten year hiatus in modelling. Troy reckoned he then knew very little about Japanese aircraft but added some tape seat belts, a clear plastic graticule plate to the reflector sight, drilled out the cannon barrels, flattened the tyres and off-set the rudder.


The model was hand brushed with Tamiya acrylics except for the leading edge IFF strips which were painted with Humbrol enamel as Troy found the Tamiya yellow did not cover well. Troy also used Humbrol silver and aluminium paints.  The tail marking for the 47th Sentai's 2nd Chutai was hand painted from a profile (the 47th used a non-standard sequence of colours for Chutai markings). Troy took these photos in his garden in 1995 with his first manual SLR camera. Pontificators of genuine wartime colour photographs should note the very different appearance of the upper surface colour between pics 2 and 3!


Considered by some to be the finest JAAF fighter aircraft of the Second World War Hayate has always been a favourite with modellers and there have been many good kits of the aircraft. Hayate 疾風 (shitsu kaze) means literally "rapidly wind" and has been translated as a squall, gale or hurricane. It conveys a sudden and violent windstorm but I have no idea why the component characters are pronounced as "hayate" (hah-yah-tay) and not as "shitsukaze"!


Image credits: All photos © 2011 Troy Smith

Monday 7 November 2011

"J3 leaning slightly towards amber colour"

I haven't tried it myself but judging from these pics of an excellent Canberra model (scroll down) Xtracrylix XA1016 RAF Hemp might be a good contender for "J3 leaning slightly towards amber colour" out of the bottle. In terms of an approximation it is a much better starting point than Humbrol 90 Matt Beige Green.

A comparison was drawn here with mentions here and here. The hobby paints for this colour do seem to vary quite significantly so some additional tinting with small amounts of green and/or yellow ochre might be required.

Update

Since blogging this I have painted out a swatch of Humbrol 168 (nice to brush paint too) and compared it to the replicated Zero paint colour. It's not a precise match and a little 'creamy' - something is missing - but for practical purposes, considering scale and for the convenience of an out-of-the-tin enamel easily available at the LHS it is a reasonable choice for the modeller, especially on a 1/72nd scale model. If Humbrol 86 Matt Light Olive is added to make it more greenish only a tiny amount is required, just a dash really; whilst to represent the more amber tones of the Nakajima-built Zeros Humbrol 225 Matt Middle Stone can be added. While I was at it I also compared a brushed out swatch of Humbrol 90  Matt Beige Green (= RAF Sky), recommended by Airfix for their new Zero model, and can confirm it is nothing like the proper colour, about as far off as far off could be. They should have suggested 168 and finally bucked the misinformation trend.

Friday 4 November 2011

Ta ka ta ka ta ka tak!


Two fairly prevalent aspects of the Wonderful World of Modelling Forums caused me to ponder this week. The first is those people who post queries, receive a whole slew of responses but then never acknowledge them. I don't get that. When there is only one response, from me, complete with sweeping my cape and twirling my moustache as I appear from the wings with my photospectrometer, Munsell codes and DE2000 calculations - "Muhahahaha!", and that goes unacknowledged I do kind of understand. There are those out there who no doubt think to themselves "I'm not replying to him" just as there are those out there who won't be told even were you to pour a tin of original Zero paint over their shoes and shove a detailed factory paint specification down the front of their shirt. Their heads are firmly entrenched in the sand and all that can be heard are the muffled determinations "Shan't", "Won't" and "Never" with an output of bright minty green Zero models ;-) One chap recently asked me to explain all the funny numbers in my posts so I did, patiently. Of course he never even acknowledged that. The request was probably only to make a point in the first place, a snide disparagement of my approach and no doubt in the hope that it would attract a little online mob shouting "burn the witch". Moderators are quick to jump in when things get heated but I am always surprised by the amount of snide sideswiping and venomous innuendo they let go - no wonder it thrives, especially on British forums.


But the second aspect is slightly more interesting. When someone asks a question, about colours, say, one presumes they ask from a position of wishing to be informed. The response "paint it whatever you like" or to just follow the kit instructions, usually with a sideswipe against the mythical "colour police" or, as one put it, "accuracy nut" (!) is becoming quite common. It is in effect a non-answer, because the person asking could have done that to begin with, without the suggestion. Very often those sort of non-replies follow detailed advice drawn from knowledge and experience which have already been posted by others or a serious discussion about probable colours. That is odd and one has to wonder at the motivation of people who want to do that. Being generous I suppose it is just an opinion and that person is entitled to articulate it, but I think there is probably more to it. I think people who post replies like that are actually seeking reassurance that their own more casual approach to building models is mainstream and that maybe they feel threatened by those who take it more seriously, at best considering them non-conformist eccentrics and at worst dangerous loons. But above all there seems to be the need to seek reassurance over perhaps a sense of inadequacy, a need to justify their lack of research or historical interest, to appeal to others just like them and to "burn the witch". This desire for people to conform to a particular approach can also be seen in the increasing number of queries that ask for a "consensus" on a subject as though afraid to step in a different direction. And it is not just in modelling, it is now becoming more prevalent in society as a whole.

Curiously this aspect of seeking to lower the bar does not appear to extend to generic modelling skills but is directed more towards matters of history and colour. And even more curiously when the subject in question is closer to home the position often changes. Suddenly those matters become more important and when Tamigawa suggest that Sea Vixen under surface is to be painted RLM 65 there is spluttering outrage. 

But I suppose the most pernicious aspect of those sort of recommendations is that, if taken to their logical and ultimate conclusion, everyone would just paint their models any colour they liked or would follow the kit instructions and there would be no sharing of knowledge or experience at all. Ignorance would prevail. Modelling would be very dull.


For those interested in old kits it seems appropriate to mark the passing of Airfix's Old Zero with a bit of trivia. It is apparent that at some stage of production the kit was changed and that there were two types of kit both marketed with the earliest bag header (above). The first molding is in a duck egg green with heavy engraved panel lines on the fuselage, very fine raised detail on the wings (almost imperceptable) no rivets at all and includes the old style stand (similar in shape to the Frog stand). The revised molding is in a lighter duck egg blue plastic with different panel lines, lines of rivets added and the newer stand (see below). There is no other distinction in the packaging that I can see. I was suspicious that maybe a later kit had been backdated by using an old bag header but examination of two mint examples reveals that this is not the case. Watch out for the two types in your kit collecting travels - the older version is a very different build experience.


Image credits: Heading image Studio Straggler + net; Tinplate Zero Fighter net; Bag header © Airfix 1959; Kit parts schematic © 2011 Straggler 'Zero Hunter' comic book cover © Fleetway Publications Oct 1963


Thursday 3 November 2011

New Airfix Zero - A Partial Build Review


The new mold Airfix Zero has finally eclipsed their old veteran from 1959 whose last fling was as a starter set with paints and new box art in kit no. A50085 (shown above) still being sold by retailers as "new" (and potentially confusing unsuspecting buyers!). Its saving grace is a decal sheet for a Tainan Ku machine V-103 with blue fuselage band and tail stripe. To be fair to Airfix this partial build review of the new Zero (I haven't finished it yet!) is made in comparison to the Hasegawa kit rather than the superlative Fine Molds A6M2.


The new kit comes in one of the shallower, end-opening red boxes with the colour painting schematic on the reverse. The clear canopy part is protected in a separate poly bag.


The parts are crisply moulded in light blue-grey plastic with all of them secure on frames - sometimes a bit too secure as we shall see. Some of the smaller, finer parts have mold seams or a little flash which makes clean up tricky. Compared to the glossy and hard (almost brittle) plastic of the Hasegawa kit the Airfix plastic has a distinctly rubbery feel. Seeing what happens when this plastic is "scabbed" (ask me how I know) and, not wishing to set hares running, I do wonder about its longevity - but only time will tell. Panel lines are slightly more pronounced than on the Hasegawa parts but not excessively so.

Construction begins, naturally, with the cockpit and this is a gem, shunting the Hasegawa kit by a wide mile. The seat, with recessed but not perforated lightening holes, is attached to supports on the rear bulkhead which fiendishly includes the headrest/rollover pylon. Fine raised detail and moulding represents the spools, bungee cord and adjusting handle for the seat. This bulkhead then fits perfectly onto a shaped floor with raised details of side console, footboards and rudder pedals. There is a separate stick and instrument panel with three decals included for the panels. These work brilliantly and look most effective when applied. Sidewall detail of ribs, stringers and instrument boxes follows the clever Tomahawk design of being raised but on a recessed panel, giving a finer scale appearance.

I painted the cockpit in a favoured "generic" of Xtracolor X113 WWII Faded Olive Drab. As well as avoiding the Mitsubishi vs Nakajima dilemma posed by the kit subject choice this colour has a subdued olive green look that under a transparency can be just about anything you want it to be. Instrument box sidewall and console detail were picked out in Xtracolor's X353 Japanese WWII Navy Green before dark washing and drybrushing.  When complete the whole assembly pops neatly and positively into place against the starboard fuselage half and the fuselage can then be closed up. It is a pity that there is not an open canopy option because the Airfix cockpit has enough going for it to cause a pang of sadness that it will all have to be viewed through transparent plastic. In the kit I am building the fuselage halves were slightly warped and had to be forced together to the rear of the cockpit. This was easy enough and created no problems but I am left with lingering doubts as to whether the tail fin is also slightly twisted from the vertical.

The machine gun fairing in front of the windscreen is a separate piece incorporating the gun sight to which the machine gun breeches have to be attached. The instructions would have you add this assembly after the fuselage halves are joined. Don't!  It doesn't fit through the gap and you will have to pare down the gun breeches and the fuselage sides to drop it in (ask me again how I know). Once it is in place though the fit around the nose panels is excellent.

The engine consists of two nicely detailed rows of cylinders that trap a propeller shaft between them, facilitating the attachment of the propeller after painting. The front row is molded within a sprue circle with every individual cylinder attached to it and requires very careful removal. The engine assembly then fits to the firewall in a similar manner to the Hasegawa kit. I found it a bit wobbly in alignment with a tendency to droop down from the centreline - but that might just be me. The cowling is a single piece which, unlike the Hasegawa kit incorporates the oil cooler intake and exhausts as moulded detail rather than as separate parts. It is slightly larger than the Hasegawa cowling and comparison between the two kits reveals that the Airfix fuselage is actually wider in plan view with a wider canopy. I'm not going to get hung up on fatal flaws but I suspect this might make the finished appearance slightly too broad in the beam like the old Zero. It has also been mentioned elsewhere that the spinner looks too small but I can vouch for the fact that it is actually larger than both spinner options in the Hasegawa kit! The overall shape and appearance of the Airfix model reminds me of the Fujimi 1/48th version.

After this construction is rapid - wings, tailplanes and separate rudder being conventional but the fit of the wing assembly to the fuselage was not as trouble-free as I expected and fettling was required to avoid a step at the roots. Before assembling the wing parts a decision must be made about the folding wingtips. Probably to avoid the risk of wonky wingtips Airfix have moulded these as part of the upper wings with separate wingtips for the folded option. This means that for a folded option the wingtips must be cut from the wings and after assembly replaced with the folded parts. A good approach and definitely non-Fujimi. The transparency has better defined frame outlines than the Hasegawa kit that should make painting easier.

The main undercarriage legs are very fine, almost too spindly, and require care, but I like the option of separate "closed" wheel covers and a retracted tail wheel for an in-flight presentation. The Hasegawa kit does not offer this. The legs are also longer than the Hasegawa parts and I suspect the Airfix model might therefore look "stalky" by comparison. The inner wheel doors are very nice, incorporating the operating brackets, and there is a separate tailhook.  The propeller consists of a blade assembly, spinner and - hurrah! - a backplate. But watch out - there is a thin lip of flash around the hole in the backplate that stops the propeller seating properly unless it is first removed - and it is difficult to see. In my kit the propeller blades were not quite symmetrical - perhaps an issue from the sprue being removed from the mold too quickly. A nice touch is separate aileron operating cranks on the top wing. The drop tank looks a little odd in comparison to the Hasegawa item, although not unduly so, but has raised line detail. Care needs to be taken with this as it has locating pins which if used create a step. It might be better to remove the pins in order to better line up the edges. The locating slot for the drop tank in the wing centre section is flashed over and needs drilling or cutting out but again care is required. The plastic is thick enough to make this trickier than it looks. I ended up with a drop tank that was not aligned to the centreline and had to re-adjust it. 

ツ-134 in flight - note the gap between drop tank and fuselage

Only a single markings option is offered in the kit, identified as an A6M2 of the 201st Kokutai at Tobera Airfield, Keravat, East New Britain, Papua New Guinea in 1944. Unfortunately Airfix's research is found wanting here because the markings actually represent an operational trainer aircraft of the Tsukuba Ku, which operated obsolete A6M2 and A6M2-K two-seat trainers in Japan, as shown in the photograph above taken in March 1944. This image reveals that the aircraft which is the subject of the Airfix kit,ツ-134 (ツ = 'Tsu' for Tsukuba) had white borders to the underwing Hinomaru, probably an indication of a trainer yellow undersurface colour as depicted in 
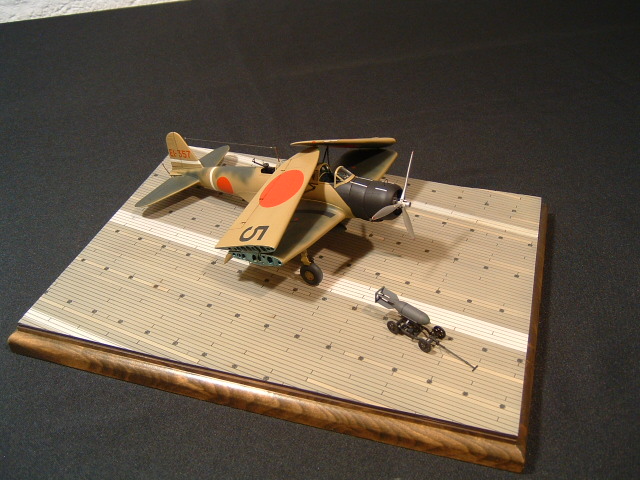
Francesco Borraccino's superb model shown here and a slightly different pattern to the camouflage undulations along the fuselage. You read it here, folks (well, possibly also at Britmodeller)! The Rising Decals sheet 72-026 for Japanese Navy trainer aircraft includes the A6M2 modelled by Francesco depicted with yellow undersurfaces and the blue-black cowling colour sweeping back to the windscreen (another indication that the aircraft was probably overall yellow originally with the dark green added later in accordance with the 3rd July 1943 directive to camouflage trainer aircraft. The Rising example has white formation keeping markings on the fuselage and the tail cone shown removed. It is difficult to tell from the photo whether ツ-134 has the swept back cowling colour but it would certainly make for an interesting model.

The 201st Ku on the other hand had the tail code W1-xxx which it used from Nov 1942 to at least July 1943. One of the tail fins in the Blayd collection has the tail code 6-136 over an earlier code of W1-187 so 6-xxx might have been used by the unit in the mid to late summer of 1943. The code O1-xxx was used at Truk in 1944. The 201st was formed from the Chitose Ku and 752 Ku in December 1942 and stationed in the Marshall Islands and at Wake until returning to Kizarazu in Japan in Feb 1943. It then moved to Matsushima. After a short detachment in the Kuriles 45 A6M3 (not A6M2) Zeros went to Rabaul aboard the carrier Junyo arriving there in July 1943. There were no Tsukuba connections for this unit. 

Whether yellow or grey is chosen for the undersurface colour the suggested paint colour of Humbrol 90 Matt Beige Green is not truly representative of the typical finish for the Zero, being the same paint colour intended for RAF Sky (see my PDF 'Painting the Early Zero-Sen'). If grey is chosen then a dove grey  or pale gull grey similar to FS 36357 or 36492 is recommended, suitable for an older aircraft like this one and dependent on how much weathering and chalking is to be represented. Using Humbrol paints I mix these warm greys using 40 Gloss Pale Grey as the base colour, adding small amounts of a yellow ochre like 225 Matt Middle Stone. Adequately thinned 40 is beautiful to brush paint and levels out nicely to an even finish. 

For the uppersurface dark green Airfix suggest 75 Matt Bronze Green which is not bad, just lacking a little in green chroma and tending towards greyish. Another problem is that it is matt whereas the typical paint finish had lustre as seen in the photograph. The original IJN paint colour standard 'D1' was a very dark green indeed, actually called "Deep Green Black Colour" (濃緑黒色) and dark enough to generate descriptions of being "black" when seen in the air. It was around FS 14036 when new and towards 14056 or even 24052 when aged. Despite its darkness it has a very rich green chroma. The other commonly applied IJN dark green 'D2' was just called "Green Black Colour" (緑黒色) and was similar to FS 14077. Again preferring to brush paint using Humbrol (for purely personal and therapeutic reasons!) I mixed this dark green colour as follows:-

6 parts 195 Satin Dark Green
1-2 parts 3 Gloss Brunswick Green
2 parts 104 Matt Oxford Blue
1-2 parts 85 Satin Black

This mix produces a very rich, deep green chroma that overcomes the Humbrol "greyish" tendency for greens and is similar to the Japanese IJN Green hobby paints. The ratio of 3 and 85 can be adjusted to achieve a greener green or a blacker green according to preference and if a more aged appearance is required a touch of red can be added to the mix which will shift it slightly towards olive.

For the blue-black anti-glare and cowling a perfect solution is to mix Humbrol 85 Satin Coal Black and 14 Gloss French Blue in the ratio 3:1 (not just 85 as Airfix suggest). For a more weathered cowling 67 Matt Tank Grey can be used.

Although Airfix's error means that the box art showing combat with P-47 aircraft is fanciful the choice of subject is still a very interesting one. It is just a pity that they don't suggest yellow for the undersurface rather than RAF Sky! ;-)

All in all this is an excellent kit for the price of £5.99 and a worthy alternative to the Hasegawa version. The Hasegawa kit is now difficult to find in the single "standard" edition but IIRC was retailing for around £8-10. The recent Pearl Harbor 'Combo' boxing with two kits is retailing for around £30. 

Image credits: All box art © Hornby Hobbies Ltd; Photo © Koku Fan magazine 02/80

Wednesday 2 November 2011

William NIchols' Tamiya 1/48th A6M3 Type 22


It is a great pleasure to be able to share this image of William Nichols' excellent model of an A6M3 Type 22 Zero built from the recent Tamiya kit in 1/48th scale.  William used Tamiya paints mixed to Greg Springer's formula and painted both the Hinomaru markings and the yellow leading edge strips rather than using decals. The model depicts an aircraft of the Iwakuni Kokutai with the attractive but infrequently modelled combination of the overall "amber grey' colour scheme displaying the yellow leading edge IFF strips. Beautifully accomplished.

Image credit: Photo © 2011 William Nichols

Tuesday 1 November 2011

Stop Press! AZ Models 1/72 Mitsubishi Ki-30 "Ann"


Three versions to be released by AZ Models, as shown here. Mixed feelings about this. Great to see a new kit (and about time) but perhaps now unlikely we will see this in mainstream form from Hasegawa, Fujimi, Fine Molds - or Airfix!!!


"China" version now available at Hannants @ £19.40.


And Thai version with French option.


Parts and instructions. 


Image credits: All images © 2011 AZ Models