Another Republic of China Air Force subject in the form of a splendid model of the Vultee V-11 made and photographed by Rob Ronconi using the Azur kit in 1/72 scale which was released in 2004. This unusual aircraft was designated as an 'attack bomber' by Vultee and exported to several foreign air arms including China, Turkey and Brazil. Two or possibly three examples were even exported to the USSR which manufactured a further 36, five from imported parts and 31 under licence as the BSh-1 (Bronirovannyy Shturmovik - armoured attack aircraft), but proving unsuitable for that role most were modified as PS-43 mail transports for use by Aeroflot.

With a three man crew similar to the Fairey Battle the all-metal V-11 was equipped with a more offensive armament of two fixed, forward firing Browning 0.30 machine guns in each wing. Bomb load was 20 x 30lb bombs carried internally, or a single 1,125 lb, two 625 lb, three 285 lb or ten 120 lb bombs carried on external racks. The bomb aimer/navigator aimed the bomb load from a prone position and also operated a flexible rear firing ventral 0.30 machine gun from a lowered hatch. The observer/rear gunner operated another flexible, rear firing 0.30 machine gun from an open dorsal position at the rear of the long canopy and was also provided with duplicate emergency flying controls. The V-11G was powered by an 850-hp Wright Cyclone GR-1820-G2 nine cylinder radial engine giving a maximum speed of 232 mph at 16,200 ft, a climb of 1285 feet per minute to a service ceiling of 20,500 ft. Maximum range was 1,220 miles.

30 V-11G models were delivered to China between July 1937 and April 1938, originally ordered by the Canton government but later taken over by the Nanking Central government. The first, Vultee serial number 30, was fitted with a SR-1820-F53 engine from the wrecked prototype NX14999, and the subsequent 29 bearing Vultee serial numbers 36 to 64. Plans were to build in China a further 26 V-12C with 1,100 hp engines from sets of assembly parts ordered in March 1939 and 51 V-12D with 1,600 hp engines in 1940. Two prototypes and four pattern aircraft were shipped as well as 51 sets of parts for assembly of the V-12D in India but it seems very few were ever built or delivered, although 25 V-12C are recorded as built under licence in China. The record of the aircraft in China was not impressive, despite its potential and the presence of Vultee representatives to advise on operating it.
The Japanese were attributed by various wartime aviation magazines as operating an identical copy of the Vultee as the 'Showa Army SB-99', claiming the Japanese identified it as the Showa Type 98. As late as 1943 the The Aeroplane magazine were still publishing these details in their Aircraft Identification series of booklets. It is possible that this belief arose from misidentification of the IJN Type 97 B5N or B5M carrier bombers.

In China the Vultees notably equipped the 14th Volunteer Bombardment Squadron. also known as the 14th International Volunteer Squadron, a forerunner of the Flying Tigers - American Volunteer Group - but consisting of European as well as American and Chinese American volunteers and Chinese aircrew. The unit, based at Hankow, also operated three Martin 139 and two Northrop 2E bombers. Some of the pilots had combat experience in Spain but some were commercial pilots without any combat training or experience. Chennault appointed Vincent Schmidt, a WW1 veteran who had flown in Spain, as squadron commander and Sebie Smith as liaison officer in charge of maintenance, with Rolfe Watson as armourer. The Vultee aircraft were first assembled by CAMCO at Hangchow and subsequently at Hankow where they were tested by Ernest Allison. He had arrived there on 24 January 1938 and also flight checked the volunteer pilots who had been arriving since November 1937 and of whom he held a very poor opinion, noting many accidents. One of the volunteers Tommy Allen confessed during his flight check that he had never flown an aeroplane before and was re-assigned as a gunner. One of the French volunteers was killed on his first flight, stalling and spinning in during an attempt to go around after overshooting the field. The first mission sortied on 7 February with six Vultees each loaded with 20 x 30 lb and two 110 lb bombs flown by three American and three French pilots with 12 Chinese aircrew to bomb a Japanese troop concentration north of Nanking. The only casualty during this mission was a gunner hit in the leg by a rifle bullet.

A mission flown on 27 February 1938 with six aircraft in two elements was to attack another Japanese troop concentration in a village across the Yellow River east of Loyang. After bombing the Vultees strafed vessels being used by the Japanese to cross the river, using both their forward fixed and flexible guns to destroy or damage 15 boats. The first element was two Vultees 14-29 and 14-32 with a single Northrop 14-11, whilst the second element was three Vultees 14-21, 14-26 and 14-30. Participating in this mission was Elwyn Gibbon, an ex-USAAC pilot rated as excellent and valuable, who racked up 250 hours flying time in the Vultee, as well as French pilots A Boulingre and William La Bussiere. Another USAAC trained pilot was George H Weigle, rated by Chennault as a very good pilot, who had accompanied Gibbon to China from the Philippines. Following a Japanese night bombing raid on 15 March which destroyed many aircraft the unit was de-activated on 22 March and its personnel re-assigned. Weigle later flew the
cannon-armed Hawk 75 fighter against Japanese bombers over Chungking but was killed on 5 May 1939 when the Hawk crashed shortly after take-off, believed to have stalled in a too steep climb out.
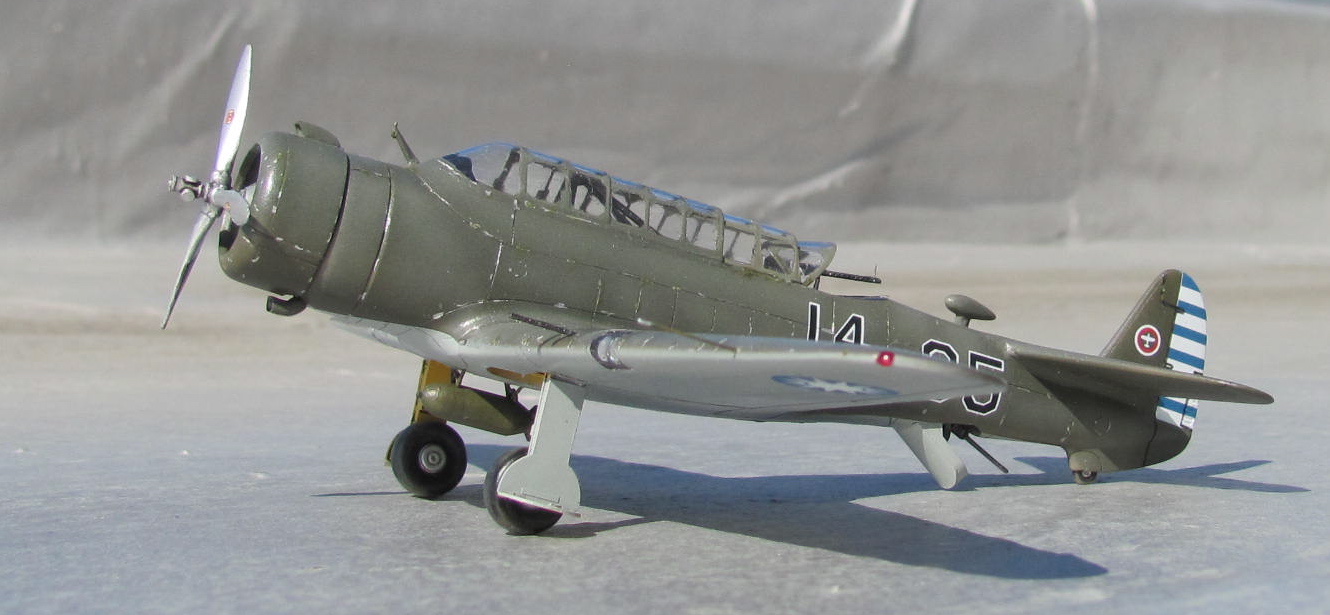
Rob's model represents aircraft # 35 of the 14th Squadron, photographed as set up level for boresighting at Hankow in a worn paint scheme. Rob has modelled the dorsal and ventral gun positions deployed for action with a bomb mounted externally on a central rack. The aircraft number is a mystery as it does not relate to the Vultee serial number range and exceeds the total delivered to the Chinese. Another Vultee photographed at Hankow bears the single white number '2' on the fuselage and a small white number '129' beneath the Vultee logo on the fin. It appears to be in a very dark camouflage finish and Lennart Andersson's book suggests it is of the 9th Squadron probably due to the appearance of a Northrop Gamma in the background with fuselage number '901'. According to Andersson the V11 was also operated by the 9th, 10th and 32nd Squadrons as well as the 14th. Andersson also notes eight North American and Vultee aircraft operated by a gunnery school 35 miles south-west of Chengtu from an American visit in June 1939. Another dark camouflaged Vultee V-11 photograph in the Andersson book shows an aircraft with the single white fuselage number '4' and a small white number '157' on the tail fin which does not bear a Vultee logo.
With special thanks to Rob for these images of an unusual aircraft subject excellently modelled and presented.
References used for the text:-
A History of Chinese Aviation - Encyclopedia of Aircraft and Aviation in China until 1949 by Lennart Andersson (AHS of ROC, 2008)
Flight in the China Air Space 1910-1950 by Malcolm Rosholt, (Rosholt House, 1984)
Vultee Aircraft 1932-1947 by Jonathan Thompson, (Narkiewicz/Thompson, 1992)
Preude to Pearl Harbor - The Air War in China 1937-1941 by Ray Wagner, (San Diego Aerospace Museum, 1991)
Image credit: All model photos © 2023 Rob Ronconi; Box art © 2004 Azur