Saturday 26 February 2011

More Colour Blues!


An interesting aspect arising from yesterday's blog about Sentai Hombu Blues is how blue colours are categorised and described. The term cobalt blue was used to describe the Japanese colour but some perceive this term to mean a much darker blue, more akin to royal blue or even indigo.

Cobalt Blue pigment

Generally cobalt blue is described as a cool, slightly desaturated blue and one online reference gives a RGB value of 61 89 171. My perception of the colour has its roots in art and colour studies in the last century (!) when it was perceived to be more like the "low end" Japanese colour, epitomised by Methuen's 22 B 7 (which is specifically described as cobalt blue), almost a kind of deep sky blue. However, if one searches in English under "cobalt blue" the Internet often throws up images of darker, deeper, more intense blues. closer to the current interpretation of royal blue and more like the Japanese concept of very bright blue (ruri shoku 瑠璃色 a lapus lazuli or azure blue).


Searching under the Japanese terms for cobalt blue (kobarutoburu - コバルトブルー) and sky blue (Sora iro  空色) throws up images which demonstrate the crossover between these two colours in the Japanese perception of them. The "low end" value for # 34 could be described as a "deep sky blue" (0 154 205), so hopefully a correlation begins to be seen and the description of this colour range as sky blue makes more sense.


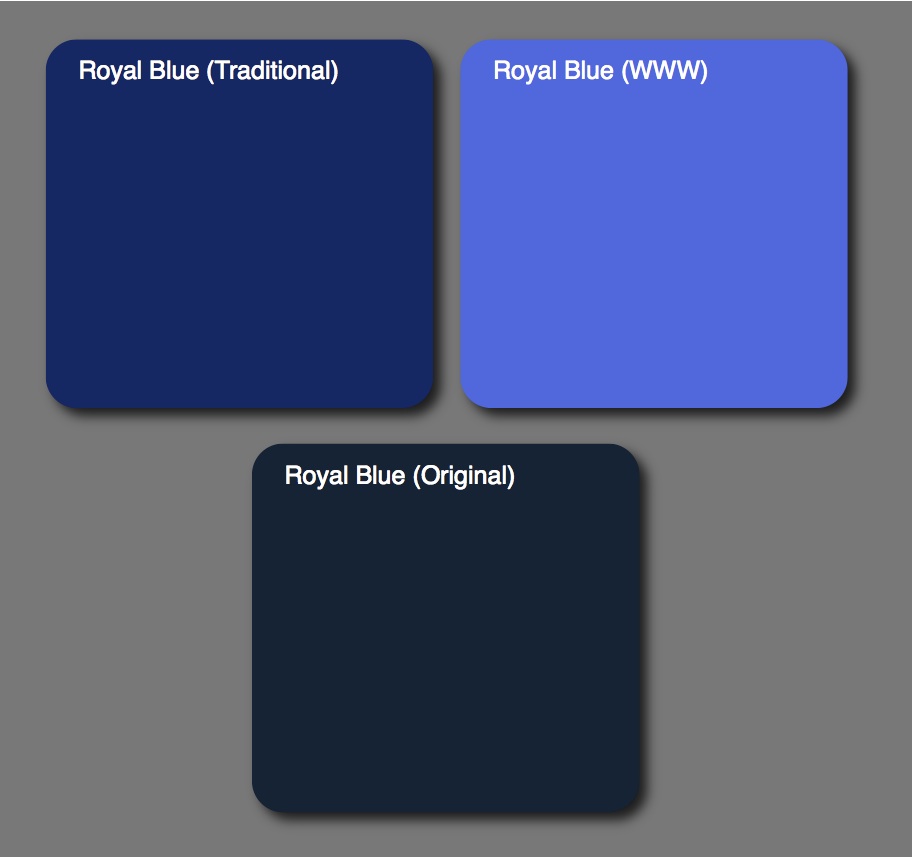
Cobalt blue is not the only colour the Age of the Internet has changed the perception of. Conventionally and traditionally royal blue used to be perceived (and described) as a deep to strong blue, often with a purple or faint reddish tinge, typically around sRGB 0 35 102. Not as dark as navy blue and with more chroma (or intensity of blue), but not far from it. However, the World Wide Web Consortium decided that royal blue as a "web colour" should be a much lighter and brighter blue, typically to sRGB 65 105 225, which apart from its brightness moves towards cobalt blue and Japanese sky blue.

Azurite pigment extensively used in the Far East and Japan

Traditionally Royal Blue (or The Royal Blue) was the name given to the colour of a cloth produced by the Scutts Bridge Mill in Rode, Somerset in response to a request from George III. The new colour was selected for the state robes of Charlotte of Mecklenburg-Strelitz, Queen Consort of the United Kingdom as the wife of King George III. It is a very deep and strong, slightly purplish blue and may be seen in this image in the robe of Her Majesty Queen Elizabeth II. The colour is very similar to the low end value for JAAF # 13.


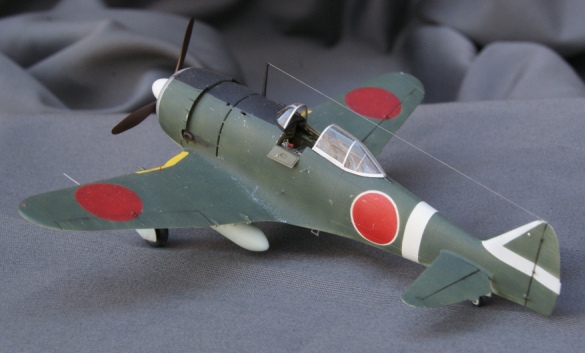
Many depictions of Japanese aircraft in paintings, profiles and even on decal sheets show a much deeper blue than the official sky blue but my confidence in the medium blue, slightly greyish appearance of this colour is linked to Thorpe's identification of A23 Medium Blue as a markings colour, the absence of any other paint standards except the very much deeper blue of A13 or Thorpe's A22 Deep Blue and a knowledge of the pigment blues available to and used by the Japanese. The slightly greyish hue of Azurite is typical of the command and chutai blues. Decals depicting this colour often shift too much torwards a turquoise or green cast as they attempt to create a true medium blue and the slightly greyish aspect is lost, or err towards a bright royal blue. An example of the less saturated, medium blue can be seen here on the spinner of a Ki-61. Compare it to the low end # 34 and Thorpe's A23 to get a feel for the character of this colour range. As mentioned in the earlier blog post the deeper blues might have been used in response to a requirement to paint a generic "blue" but I doubt that they were typical for markings, not least because of the visual aspects of recognising their hue at any distance.

Traditional cobalt blue is quite a difficult colour to mix. Many moons ago Microscale had a decal sheet offering the well known markings of the Ki-44 'Shoki' of the 85th Sentai commander Maj Togo Saito. The blue printed on the decals was just right but the model needed a blue spinner of the same colour and it was a difficult match, close but ultimately unsuccessful.  In Humbrol paints the old Authentics "German Light Blue" for WWI aircraft was a good approximation of the typical colour for # 34 Sky Blue, and is now available as 109 Matt WWI Blue in slightly altered format. In those days it was quite common practice to re-paint decals to match the paint colour used on the model - I always found this easier to do after the decals had been applied for some reason. The poor opacity, particularly of white, meant that the borders of fuselage and tail stripes were frequently over-painted with the 00 or 000 brush. Oh for the steady hand and sharp eye of those days!


This experience has pointed out to me the danger when using colour terms like cobalt blue and sky blue of assuming that everyone else will visualise the same hue!

Image credits: Portrait of HM Queen Elizabeth II by Nasrat Allah Shiraz after Pietro Annigoni; Rendered colour chips ©2011 Straggler

Friday 25 February 2011

Sentai Hombu Blues

The JAAF paint colour standards included only two "pure" blues. Blue # 13 (Ao iro 青色) was a dark blue that might be described as a navy blue colour. Sky Blue # 34 (Sora iro  空色) was a cobalt blue associated with the light blue JAAF arm of service colour. It is probable that the latter colour was used most frequently for command and chutai markings. It can be recognised in many descriptions and depictions of Japanese Army aircraft, frequently described as "cobalt blue" (kobarutoburu - コバルトブルー) or simply "light blue" (淡青色) But contemporaneous use of the generic term "blue" implies that a certain level of misinterpretation or misunderstanding could and did apply to the application of these colours in practice.


The JAAF paint colour standards documented their acceptable colour values (for acceptance testing of contractor supplied paints) using the Hess-Ives colour scale. Equipment was available to facilitate this but it also depended on a visual comparison by the operator to assess whether the paint sample was deemed to match the acceptable colour values. The Hess-Ives system combines the weighted chromas which represent the red, green and blue shares of the transmission spectrum of a measured sample at three wavelengths into one single value. The interesting aspect of these values, which were officially documented for each colour in the standard and still exist, is the considerable range of variance permitted for each, probably in recognition of the limitations of the localised Japanese paint industry in supplying paint to the Army and aircraft manufacturers but also perhaps in recognition of the impermanence of many paint colours in field conditions. This was commented upon at the time and will be explored again in respect to specific aircraft types.


Again it is important here to emphasise the difference between a paint colour standard, which sets out the parameters of the colour the paint was intended to match, and the actual paint. Apart from the tolerated variance built into the acceptance system, what happened to the paint after it had been applied, in terms of weathering, degradation and external impacts cannot be quantified for each and every aircraft. The paint colour standard, therefore, serves only to provide a visual understanding of the intended or ideal colour. In this field of research and interest it still performs a valuable function, because it can fill gaps in the limited knowledge derived from extant samples, help to reconcile apparent anomalies in wide variations of extant paint colour and serves as a benchmark to be confidently adapted in the absence of any other specific data.

Blue paints applied in field conditions might not always have been procured to the official standards even though they might have been matched expediently to them as the closest available alternative. Units might have resorted to mixing available paints to obtain those required, using blue and white for example. The JAAF Sky blue standard is approximately consistent with the Thorpe colour A23 Medium Blue also shown here.


The chips for these colour standards have been rendered by converting the original Hess-Ives values back into RGB using a proven formula. The colours can be viewed about as closely to how the original JAAF acceptance operatives saw them as it is possible to get. The table above shows the closest FS 595B equivalents to the Methuen, JAAF and Thorpe cobalt blues.

Here are the closest calculated FS 595B values where a difference of 2.0 or less equals a close match:-

# 13 low 15044 @ 7.07 (not blue enough)
# 13 high 25045 @ 1.83 (good match)
# 13 med 15044 @ 2.22 (darker)

# 34 low 25190 @ 4.43 (duller and greyer)
# 34 high 25450 @ 5.90 (greyer, not blue enough)
# 34 med 35250 @ 2.05 (a little too bright)

Image credits: Pilot image 零戦落穂ひろい (http://blog.goo.ne.jp/summer-ochibo); All rendered chips ©2011 Straggler

Thursday 24 February 2011

Alex's 1/48th N1K1 Kyofu Floatplane Fighter


These images of Alex Angelopoulos' superb Tamiya N1K1 Kyofu build are a timely reminder of the unfinished 'Kyofu, Shiden and Shiden-kai' series here, here and here.


Alex says modestly that this was an OOB build using the kit painting instructions and expects us to believe it is his first Japanese model! ;-)  A beautiful replica of an impressive looking floatplane fighter. Thank you for sending the images.


Before getting back to 'Kyofu, Shiden & Shiden-kai' though, there are more early Ki-43 colour schemes and Ki-46 interceptors to explore.


Image credits ©2011 Alex Angelopoulos

Thursday 17 February 2011

Fine Molds 'Ultimate' 1/72nd A6M5 Zero

The latest Fine Molds "magazine kit" arrives to what seems like a deafening silence. The "De Luxe Magazine & Kit 2 in 1, Ultimate Zero Type 52", Volumes One and Two, have now been released. As with Fine Molds previous Zero kits, it is attached in two parts to the February and March issues of the Japanese 'Model Graphix' magazine. This irritating marketing method makes no concessions whatsoever to overseas interest in these aircraft and if you want one of these small, plastic, 1/72nd scale kits means that it will cost you £22.64 (USD $36.47) for the privilege, not including post & packing - or customs charges. Dragon's Meteor begins to look like value for money. For Japanese aircraft modellers the "bonus" of the two magazines is of dubious value. They are almost entirely in Japanese and full of robots, armoured fighting suits and those female figure kits that are either cute or creepy depending on your point of view. The publishers seem to have missed the opportunity to produce a pair of Zero 52 special issue magazines to go with the kit.


The Zero kit parts are sealed in plastic bags, lost inside large, impractical boxes designed to match the A4 size of the magazine. For hoarders there is no convenient, compact box to store the whole kit and for those who appreciate it, as I do, no box art to admire. Is this the future of Fine Molds Japanese aircraft kits? I hope not - but thank goodness their excellent Ki-61 series was released before Model Graphix hove into sight! In terms of attractive, tempting presentation Sweet is far and away ahead, albeit in 1/144th scale. Unfortunately the Fine Molds parts do not fit into the Sweet box! In the FM A6M2 release a "do-it-yourself" box and box art were provided - but not with this one.


But what of the kit itself?  Those who have purchased the previous "Ultimate" A6M2 and A6M3 kits will know what to expect. It is "molded in color" - well almost - in this case predominantly dark green plastic which gives it a surprisingly archaic look and is perhaps not the best colour to show off all that exquisite detail. Cockpit parts are molded in olive green, the engine and prop in silver and the cowling in a very dark grey. The cowling was the first thing that struck me about the kit parts. I immediately thought how small, slim and tapered it looked, almost underscale, reminding me, most unfortunately, of the old Revell kit in this scale. Some of the photographs of built-up kits reinforced this impression (although to be fair others look ok). Either the prop seems a little too big or the cowling too anaemic - or something. Something looks not quite right about the set up here and this is reinforced by a photo showing the A6M5 in profile against the previous A6M2 model. Somehow the A6M2 cowling manages to look more robust and beefy! These are preliminary impressions and could well be wrong as I have not yet compared the kit parts to plans (!) or the workmanlike Hasegawa kit. Comments from those who might have are welcome and I'll happily update or correct this review as necessary.


A nice touch are the optional open or closed canopies which will benefit the spares box, optional dropped wing flaps and optional open or closed engine flaps. The cockpit is highly detailed, with awesome for its scale sidewall clutter and separate decals for each instrument in the panel, but if you set store by such additions you will need to find photo-etch seat belts elsewhere. One of the magazines contains a two page colour walkaround of the Yasakuni Zero and a couple of poor paintings but if you expect two magazines stuffed full of useful Zero 52 reference material you will be sadly disappointed.


Sweet also excel in interesting markings options, the three offered in the Fine Molds kit, all Mitsubishi-built examples, being somewhat uninspiring. In fact, at this price and given the A4 presentation one might have reasonably expected an A4 sheet with a multitude of interesting schemes for the aircraft of notable pilots. Japanese hobbyists seem to have settled on RAF Sky as the required undersurface colour for the A6M5, whether Misubishi or Nakajima (and RAF grey-green for the interior - those stocks of RAF paint at Rangoon must have been enormous). The upper surface greens are looking very green in some images, perhaps not out of place in a St Patrick's Day Parade, although the instructions suggest GSI Creos (Gunze) 124 Dark Green (Mitsubishi).

That's about it. An "ultimate" 1/72nd A6M5 that leaves me slightly underwhelmed by its presentation, price and the lingering doubts about that cowling and prop.

UPDATE


A comparison of the Fine Molds kit parts with parts from the Hasegawa A6M5 Type 52 ('Super Ace' issue #00919) appears to confirm these preliminary impressions. The Hasegawa cowling is larger, deeper, slightly less tapered whilst the Fine Molds spinner is slightly smaller than the Hasegawa example in base diameter and profile. The Fine Molds cowling is slightly shallower in profile, narrower in plan and has an overall smaller base diameter, with a slightly more tapered shape towards the front. The fuselage halves match almost perfectly so it does not seem to be a scale issue. It is tempting to think this might just be due to fidelity of scale thickness as the Fine Molds cowling is thinner plastic, but the slightly odd look of the made up models suggests not. Will try to post comparison images later.

Image credits: All ©2011 Model Graphix & Fine Molds

Friday 11 February 2011

One To Look Forward To - Imperial Japanese Army Flying Schools 1912-1945


A new English language book on the subject of Japanese Aviation is always welcome but especially so this one that promises to refreshingly address a less well-known and fascinating aspect of Japanese Army aviation. Due for publication this April it details the history of Imperial Japanese Army Flying Schools from 1912 to 1945, covering not only the formation of the schools, but also the evolution of the training aircraft and the training of pilots, other aircrew, and ground crew maintenance personnel. The book includes numerous photographs, many of which have not been seen before in English language publications and in addition some 400 colour art profiles illustrate the wide variety of aircraft types used and the different markings they displayed. This will provide much colour interest and inspiration for modellers to explore a completely new field.

The authors credentials in this field are well known. Don Marsh has always demonstrated meticulous research and an eye for detail in his aircraft profiles, as well as a special knowledge of and affinity for the historical, cultural and artistic aspects of Japanese military heraldry. Peter Starkings is a former IPMS (UK) Japanese Aviation Special Interest Group (JASIG) leader and editor of its well-respected newsletter JAS Jottings, with many fine articles on the subject of Japanese aviation history under his belt. It has been a privilege to show some of Peter's own accomplished JAAF models here.

Image credit: © Schiffer Publishing Ltd., 2011

Tuesday 8 February 2011

More 1/72nd Scale Japanese Aircraft Models


It is always a very great pleasure to see other people's models of Japanese aircraft and a privilege to be able to share them here. I confess a preference for both JAAF subjects and 1/72nd scale, especially those made from older kits, but Michael Driskill's prototype "George" from the superlative Tamiya kit is an attractive variation on the usual IJN colours so the whole package is a delight to see. The yellow colour is absolutely convincing and very well chosen in contrast to the very reddish oranges often seen on IJN prototype and trainer models.


Michael's "Babs" is particularly sharp, depicting the later type in Army service and with a very subtle and convincing colour scheme - more details please! A good looking aircraft and deservedly popular with modellers, with the LS/Arii kit still available and a sound basis for the type.


The "Nick", another of Michael's models is from the older Revell kit, one of a series of very fine Japanese twin-engine types produced in collaboration with Takara in Japan in about 1972. The other types were "Helen", "Sally", "Frances" and "Irving". The quality and detail on these models was well ahead of its time and the kits ooze both inspiration and nostalgia, but where are the molds now? A mystery. Michael's model displays the kit at its best and it remains a respectable alternative to the more recent Hasegawa variants.


Hasegawa's "Tojo" remains the only 1/72nd kit of this type, model production being almost as limited as the real aircraft and perhaps reflecting the fact that not a single example has survived. Michael's model depicts a less well-known scheme from the 85th Sentai in China and shows just what a fine replica can be made from the kit. Very fine models all and thanks to Michael for contributing them. I hope we shall see more from him in future.


From Jeff Groves come images of another superb late model Army "Babs", this one painted to perfectly represent the unusual and elaborately painted mottle seen in photos posted here and here. Jeff wrote about the build as follows:- 


"I was particularly interested in the picture of mottled Babs you posted on 9 October, and the picture of the same aircraft posted earlier.   It is a fascinating aircraft.   I found myself contemplating it on several occasions, to the point where I was inspired to order the old 1/72 scale LS kit and test my patience with the minute mottles.


I had built the LS Ki-15-I kit many years ago.  I have fond memories of that build, and 35 years or so after it’s initial release, the kit still does not disappoint!  Finely recessed surface detail, good fit, nice shape, and razor-thin trailing surfaces are highlights.  Cockpit detail is sparse, and some of the smaller bits are clunky, but those details are easily corrected.  Despite it’s age, many manufacturers could still learn a trick or two from this kit!


The build was very straight-forward.  The kit provides a basic cockpit floor, seats, stick, and instrument panel, with some details for the decking.  I built up the cockpit, mainly to prevent the see-though look.  Keeping with the VIP transport / liaison hack premise, the observer’s “stool” was replaced with a bucket type seat.   The kit supplied engine did not look the part, so I modified and wired a spare radial engine from an AMT Ju88 kit.  The cowl flaps were thinned, flexed open a bit, and the exhausts drilled out.  I also found the single central flap irresistible, so I dropped it and added ribbing from bits of Plastistruct.


I am not imbued with any special insight when it comes to determining colors from black and white photographs.  In this case, the tail markings are also subject to guesswork.  After checking references, I thought a base color of A4 light blue gray with (field applied?) mottles of A1 was defensible, although a case can certainly be made for others combinations.  Likewise, I chose a white stripe on the vertical stabilizer, although a white tip could also be argued, and yellow leading-edge stripes.

I masked off all the stripes and painted the base coat of A4 using Tamiya XF23 mixed with light gray, then applied Techmod Hinomaru decals.  The overall A4 scheme is quite pleasing, but I resisted the temptation to stop with that.  The mottling took over five hours, using Tamiya XF27 black green.  One note, the mottle appears more dense aft of the observer’s fuselage windows, especially in the picture with the gentlemen posing.  Perhaps the work of two painters?

A few other points to mention.  The prominent radio mast forward of the canopy is missing in the photographs, so I left it off of my build.  It certainly could have been present when the aircraft was serviceable.  Also, Ki-15’s had an intricate pitot tube assembly, and there are several variations.  The kit provides two choices, both very clunky.   I fabricated a wire replacement using the taller pattern, but the pictures do not show which was used on this aircraft.

A very enjoyable build, and I would welcome any additional information on this aircraft."

Jeff's build was inspired but serves in turn to inspire and his enthusiasm permeates throughout his description of the project. Genuine enthusiasm for the subject is always revealed, and rewarded, in the models themselves and invariably transcends all the old arguments. Thanks for sharing that enthusiasm here. I would love to see some more images of that older model "Babs" in the background too! 

Please do continue to send in photographs of your Japanese aircraft builds. All are appreciated, however long they might take to appear (!) and here they will find a more permanent and welcome home than on forums where they often "disappear" after a day or two. Japanese aircraft enthusiasts from all over the world are continuing to discover this blog for the first time and to enjoy trawling through the archived posts, but especially to be able to view the inspiring images of the models "preserved" here.

Correction Update

Corrected the "Kiroff" rendered chip in the second schematic of RLM 02 colours here (top row, left hand chip). It was rendered with the incorrect sRGB values. If you have downloaded and saved this schematic please replace it. The sRGB values in the table were/are correct.


Image credits: All photographs ©2011 and courtesy of Michael Driskill and Jeff Groves

Monday 7 February 2011

Hayabusa #750 of the 11th Sentai


Some interesting colour photos of Hayabusa # 750 during restoration were posted on j-aircraft.com with an  observation that the only remaining paint that could be seen on the airframe was "dirty brown" and the "dark grey" of the anti-glare. This type of observation might give rise to a misperception about the original colours of this aircraft, especially in the absence of other, perhaps less accessible, information. 


Hayabusa #750 was an 11th Sentai machine found hidden four miles from Vunakanau Airfield, Rabaul by Sqn Ldr Denys Hamilton and RAAF party in September 1945. The aircraft was in the hands of a JAAF repair unit, the 14th Army Repair Depot. It was subsequently crated and sent to Australia in December 1945. The Hayabusa remained in the possesion of the Australian War Memorial Museum until 1953 when it was sold to R G Curtis. From 1962 until 1980 it was owned by Sid Marshall. In 1985 it was sold to Col Pay at Bankstown Airport NSW. Eventually in 1993 it was purchased by the Alpine Fighter Collection in NZ and completely restored by Jan Bullock and Doug James to its original colour scheme and markings. This veteran survivor is now in the possession of the Flying Heritage Collection at Paine Field, Washington, USA.


At the "Warbirds Over Wanaka" airshow on 29th March 1996, pilot Simon Spencer-Bower took Hayabusa # 750 on a high-speed taxi run and to the amazement of the watching crowd lifted her briefly into the air. This was the first time that a Hayabusa had flown since the end of hostilities in 1945 and remains the only time that an original Ki-43 has flown.


There is a fairly detailed restoration report for # 750 from the Alpine Fighter Collection which clarifies exactly how much original paint remained on the airframe and what it was. It is perhaps best to let the report speak for itself (with my emphasis):

"Before restoration commenced, original JAAF markings were clearly visible, along with what appeared to be a lightning flash on the tail. Research into this revealed that this was the insignia of the 11th Sentai. Also visible were three chevrons behind the rear canopy. Our research was inconclusive as to the meaning of these and they were to be a riddle for a few months yet.


"Unfortunately, because the aircraft had been paint stripped in Australia many years before no paint flakes were visible on the chevron outlines. Other parts still had original paint flakes remaining however, and prior to restoration paint samples were collected from each area to ensure as much original evidence was recorded and saved as possible. This paint research and colour matching continued throughout the restoration programme. We made a decision to paint the aircraft in lacquer to enable an adequate flattening agent to be used and to keep the appearance in the era in which the Oscar was constructed. It is important not to overglaze the paint and ruin the historic appearance of the aircraft. 


"A widely held theory that this aircraft was actually two different aircraft which had been put together some time since the war, probably evolved because in the main, the forward fuselage and wing sections had not been paint stripped. Through identification of serial numbers we were able to disprove this notion, but it is easy to understand how such theories come about.  

"We also thought the rear exit door was from another aircraft, as it was painted cream and visually did not tie in with the rear fuselage bare metal. However once we had stripped the rear exit door, which fortunately for us had escaped the early paint removal in Australia, we found the remains of the Hinomaru quarter, with white band and green paint flecks of what was to be the main colour of Hayabusa 750. Research indicates that aircraft with a white band encircling the Hinomaru on the fuselage normally had a dark colour scheme. The Oscar now fitted this evidence, tying up the rear exit door with small amounts of green found elsewhere on the body

"Another major find confirming the main colour (green) of the aircraft was discovered. The butterfly flaps (combat flaps) had at some stage in Australia been covered with modern Ceconite. Removal of this Ceconite to enable rework exposed the original fabric still intact in the main and in the same green as flakes removed from the rear exit door and fuselage. Because this fabric had been protected over the years with the Ceconite, a cutting agent was rubbed on the original paint to remove oxidisation providing a larger sample to ensure that the colour match was more accurate, Because the original fabric had been torn, which is probably why someone had recovered them in Ceconite, the flaps themselves required some rework. The original fabric was carefully removed before rework and refabricking was undertaken in the same fine linen material as we had used for the rudder. 


The restoration team were also able to make contact with one of the original maintenance crew of the 14th Army Repair Depot who had been photographed with this very aircraft when it was captured.

" . . . although not part of the 11th Sentai, but serving with the 14th Army Repair Depot in Rabaul, (he) did recall that the colour scheme of 750 was as we had deduced, but he told us that it also wore camouflage brown. He was not able to remember what colours the chevrons or lightning flash originally were, so we relied on our samples for the flash, and used white for the chevrons, believing that further information would eventually surface regarding this as indeed it did. 


" . . . veteran Japanese Army Air Force personnel and other interested parties solved the riddle for us. One of the veterans had actually served with the 11th Sentai although based elsewhere. He told us that the chevrons meant that our Oscar flew in the third flying position (three chevrons - 3rd - yellow), of the 11th Sentai’s 2nd squadron (red lightning flash). The chevrons were repainted yellow the next day."


Although note that no distinction in this finding was drawn between Shotai and Chutai formations. The well known restoration colours are probably as good as they might be and certainly not deserving of any presumption of inadequacy occasioned by ignorance as to what was actually done. Of course it is always possible to question the veracity or memory of the maintenance man, to challenge the integrity of the paint analysis or colour matching - but by what criteria and to what purpose?  Maybe, maybe, maybe?  Is the subjective interpretation of a greyscale photographic image really to be preferred to such documentation? Scepticism in research may be healthy but a tendency to throw the baby out with the bathwater is probably best avoided. 

In pursuing this subject further the original restoration team were requested for additional information regarding the paint colours, but unfortunately, although the analysis and matching had been carefully done, the actual colour values were not recorded. More on early Hayabusa colours to follow. 

A fine selection of walkaround and close-up detail images of # 750 are to be found in Aero Detail 29 which is recommended for Hayabusa enthusiasts as one of the best and most accessible English language references to the type.


Stop Press! New Airfix Zero due!


An image of the prototype model of the planned new Airfix 1/72nd scale Mitsubishi A6M2 Zero has been shown around the web, taken at the Nuremburg Toy Fair by Thomas Voigt. If the kit turns out to be as good as it looks this is to be welcomed as the Hasegawa Zero kits can be tricky to obtain and expensive, as is the superlative Fine Molds kit, whilst all the others are long in the tooth now. This should be a relatively inexpensive canvas on which to try out all those Zero colours, although no doubt its appearance will set the whole "debate" going again.

Credits: In flight photo © Dave McDonald; Airfix Zero © Thomas Voigt; Other photos from internet; Restoration report extracts Prue Wallis