Thursday 30 November 2023

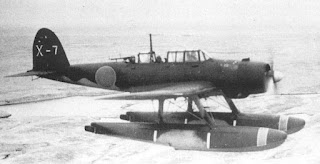
Aichi E7K2 'Alf' in 1/72 by Rob Ronconi

Continuing the IJN floatplanes theme with a splendid and superbly photographed 1/72 model of the Aichi E7K2 'Alf' Type 94 Reconnaissance Seaplane Model 2 made from the 2022 AVI Models kit AV72021 by Rob Ronconi. Rob also built AVI's E7K1 in parallel which will be featured here shortly.

Rob made the model pretty much out of the box noting a few fit problems to overcome but appreciating the final result. He added a Fine Molds Type 92 machine gun from their plastic Nano Aviation series with some photo etch ring and bead parts, Uschi Van der Rosten rigging and an Albion Alloys custom pitot tube. 

The model represents an aircraft カシ-83 (KaShi-83) of the Kashima (not Kashiwa) Ku using the decals of one of the kit's three markings options. An IJN seaplane training base had been established at Lake Kasumigaura in 1938 with the Kashima Kokutai formed there in May 1938. Traces of the seaplane slip still remain and the photo below shows a Kashima Ku 'Jake' KaShi-96 being prepared for launching from the catapult on the slip. 

Remains of Kashima Seaplane Training Base today


With special thanks to Rob for sharing these images of his excellent model.

Image credit:- All model photos © 2023 Rob Ronconi; Jake photo Web; Aerial photo Google Maps 

Saturday 18 November 2023

The Nichimo E13A 'Jake' revisited by Michael Thurow ‒ Part 1


It is a delight to host this first part of an article on re-building and improving a Nichimo Aichi E13A 'Jake' floatplane model by Michael Thurow. It is still a matter of some puzzlement that a 60 year old 1/50 scale kit of such a significant aircraft widely operated throughout the Pacific War has not been superseded by a more recent mainstream or state of the art 1/48 scale kit. And the same goes for the Hasegawa 1/72 scale kit from 1971. There have been kits galore of far more obscure and even projected but never produced Japanese aircraft designs but sadly the IJN workhorse 'Jake' has been ignored, even it seems in vacform or resin media.  And even the Nichimo kit may now be gone forever! Over to Michael then:

The Nichimo E13A 'Jake' revisited ‒ Part 1

Michael Thurow

When I started my floatplane project earlier this year [1] I retrieved an aged Aichi E13A that I built in November 1991 for my 1/48 Japanese series. As more information about kits and models became available with the rise of internet it dawned on me that this was not the 1/48 scale claimed by Nichimo but Marusan's prehistoric 1/50 kit of 1963.

Now I wondered how I was to include this oddity in my new collection. One option would be to keep the model as built out of the box 'in the context of its own art form rather than a scale representation of the original aircraft' (Nick in his May post on the Ginga). But wouldn't it be worthy of a refurbishment? After all, there is no proper 'Jake' in this scale range.

Regrettably I missed the opportunity to take a picture of my original creation before I reached for the chain saw, and therefore can only offer a first view of the model in its dismembered state (with some modifications already in place). You can easily perceive why after a very few hours I wished I had never begun this experiment!

The advantage of working on a once finished model, however, lies in the easy perception of the kit's shortcomings. Step 1 of my project is focused on airframe shape and surface. Let's see what needs to be done.

Apart from many simplifications and inaccuracies there is a major issue with the actual scale (all measurements against a 1/50 scale drawing [2] in Maru Mechanic 12) -

Overall length: OK
Wing span: 5 mm too short
Wing chord: 5 mm too narrow
Tailplane: 10 mm too short and 5 mm too far forward (should be staggered)
Floats: 5 mm too long, a bit too wide and spaced 3 mm too wide (accurate for 1/48!)
Flaps: Wrong planform at the wing root and a broad gap at the bottom
Ailerons: too long into the wing tips


In retrospect, increasing the wing chord will remain the only flaw I feel unable to address. To avoid an untypical lathy wing aspect I'm planning to conceal it by folding the wings.


The bottom centre section demanded a number of detail improvements. Marusan's proposition was a little too artistic [3]. Note the tedious amount of inspection holes on the E13A.


At this stage I began debating with myself whether to try and move the horizontal tail back to its proper position. That would add at least another couple of days to an already complex project. Finally my loco ambition took over - what can be changed should be changed!


To round off this episode I scribed some more panel lines and refreshed the riveting. To be continued . . 

Annotations

[1] My first finished model, a Vought Kingfisher, can be viewed here.

[2] Maru Mechanic's dimensions and proportions were verified as accurate by taking ratios from two straight E13A profile photos as follows: Fuselage (from engine gills to vertical stabiliser) vs canopy length = 1.9; vs float length (less rudder) = 0.9; vs. overall height at rudder hinge = 3.5.

[3] An internal layout profile in Maru Mechanic (p.19) shows the bombsight stored on the port side of the observer's cockpit (photo evidence on p.29) and the recce camera on the starboard side. The larger floor window should then be to starboard as in the Model Art No.565 scale drawing.

With special thanks to Michael for sharing this interesting and useful article. A tour of the various Marusan and Nichimo Jake kit releases may be found here.

Image credit: Heading photo via Wiki; Box art © 1970 Nichimo & © 1963 Marusan via Michael Thurow; All other photos © 2023 Michael Thurow 

Tuesday 14 November 2023

Navy Type 13 No.3 carrier-based attack aircraft modified seaplane (Mitsubishi 3MT2) by John Haas Pt.3


The third and final part of this magnificent scratch-build project from the skilful John Haas, the first and second parts to be found here and here. A three bay biplane is challenging enough in kit form (think Frog Vimy) but this model had the added complication of strutted floats. The inclusion of figures and another floatplane model in the photos demonstrate how comparatively large this aircraft was. A masterpiece. Over to John then.  

'Dear readers, after building the main parts, I could turn my attention to all the tiny bits and pieces and in between, do some painting.

'First I painted all the struts black, thereafter the floats got their silver finish. As usual I left part of the fuselage unpainted so that I could handle the model without damaging the paint.

'Whilst the paint was drying, I kept myself busy with the construction of a beaching trolley and some wooden supports. The trolley is loosely based on several different examples which I found on photographs on the internet.

'I then paid some extra attention to the construction of a scarff-ring and the machine gun, I had some leftover kit parts, but they were rather bulky and not accurate, so with some stretched sprue I made the parts from scratch.

'So I arrived at applying the last details; the control horns and cables. 

'Finally, what was left were the Hinomaru. They are big and I had no more left in my spare decal clippings box, so I had to print them with my PC printer on white decal paper. 

'I would have liked, to include the nice Japanese logos and scripts on my model, but I had no luck finding a good example which I could use as a print pattern. And to paint them by hand . . . I only can manage the ' no step ' markings in Kana! :-)

'To conclude the build, I handpainted the red warning strips on the floats. With the large stringers on the floats a decal would not have worked here. Model finished!  

'To summarise I had great fun building this model, although I knew that the floats and struts construction would be tricky - and sure it was! :-) 

'And later I discovered the reason for the double wings truts, the outer wings could be folded backwards, so the inner wing needed extra support struts.'

With very special thanks to John for sharing these images and details of a challenging build - from scratch! - and with a superlative result.

Image credit: All photos © 2023 John Haas

Sunday 12 November 2023

Update on 3D Japanese Vehicle models


Since blogging about the Military Scales range of Japanese vehicles from PlayMoreIT3D Kevin Bade has received and kindly reported on some of them. His observations have been added to the original blog. 


Image credits: Photo of Guadalcanal roller via Wiki; Model image © 2023 PlayMoreIT3D

Friday 3 November 2023

Kugisho E14Y 'Glen' in 1/72 scale by Christophe


Continuing Aviation of Japan's IJN floatplane season reader Christophe from Switzerland has kindly shared these images and details of his build of the Hobby 2000 boxing of the Fujimi 1/72 kit of the Kugisho E14Y 'Glen' - Type 0 Small Size Reconnaissance Seaplane (Rei Shiki Shou Gata Suijoh Teisatsu-ki - 零式小型水上偵察機) released in 2020 and finished as one of the very attractive 'early' kit options in the silver and red scheme as an aircraft from the submarine イ-7 (I-7). The other kit option is another silver and red aircraft コ-35 (Ko-35) from the Yokosuka Naval Technical Arsenal in September 1942. Hobby 2000 released a second re-boxing of the Fujimi 'Glen' with two camouflaged subjects , one of themイ-25 from the submarine I-25 as flown by WO Nobuo Fujita and CPO Shoji Okuda in their September 1942 incursions over the USA. The other camouflaged option  is '671-05' of the 6th Fleet Reconnaissance Corps at Kure naval base in November 1942. Jim Anderson built an excellent model of a stable mate 671-10 from the original Fujimi kit which was featured here in February 2021. 

The Hobby 2000 kits are distinguished by their inclusion of Cartograf decal sheets, a step up in quality from the Fujimi decals.  The Fujimi kit was first released in two versions in 1997 with コ-35 presented in an orange-yellow finish, a neat little injection moulded kit and it came with a submarine catapult launching rail for display. It has been released in different guises several times including a special edition with a metal engine in 1998. MPM had also released 'Glen' as a 1/72 short-run injected moulded kit in the early 1990s and earlier resin models were released by EurokitAirmodel (Frank-Modellbau), Miyazawa and RS Models, with vacform examples by The Eagle's Talon, Wings and Airframe.  There was also a 1/72 kit by WK Models which I think was short-run injection moulded. No shortage of kits but Fujimi's was the first main stream injection moulded and builder friendly kit. 

Christophe chose this model because he likes Japanese seaplanes of WW2, had just completed the Tamiya Seiran and wished to add another submarine carried floatplane to his collection. He added to the basic interior with some scratchbuilt details, as well as cutting the kit canopy apart and replacing the moving sections with vacuum formed replacements.

Assembly was straightforward and Christophe then primed the whole model in black before applying the silver finish using Vallejo acrylic metal color. He applied the decals after a varnish coat and then completed the model with some light weathering.


The I-7 and I-8 were large, long range scouting submarines of the J3 type, the largest built before the Pacific war and intended to serve as flagships for squadron commanders. The I-7 was laid down at Kure in September 1934  and completed in March 1937. After supporting the attack on Pearl Harbor under the command of Kiichi Koizumi and on 17 December launching its 'Glen' to survey the effects of the attack, the I-7 became the flagship of the 2nd Submarine Squadron under Capt Tomejirô Tamaki in the 6th Fleet's submarine force with the tender Santos Maru serving submarines I-1 to I-7.  In October and November it launched its 'Glen' to conduct reconnaissance flights over Espiritu Santo in the New Hebrides and Vanikoro in the Solomon Islands. By January 1943 it had become part of the 7th Submarine Division. On 21 June 1943 I-7 was damaged at night by gunfire from the USS Monoghan (DD 354) and run aground at Vega Bay, Kiska in the Aleutians.


With special thanks to Christophe for sharing these images and details, and for his patience in waiting for them to feature here.


Image credits: All model photos © 2023 Christophe