A site dedicated to information and discussion about the history of aviation and aeroplanes in Japan and the Far East. 日本と東洋の航空史と航空機に関する専門サイト。皆様からの情報やコメントをお待ちしてます。(日本語でも可)
Monday, 3 May 2010
Wednesday, 28 April 2010
Kit Trivia ~ Hawk's Zero
The image below shows the front and rear of the end-opening box for the Testors 1978 re-issue. The kit is unchanged apart from being molded in a good quality grey plastic. Decals were by Microscale but nevertheless out of register on my example. 'Yo-147' was again the only markings option. The instruction sheet in this version was new and gave detailed hints and tips, including how to weather the model!
As recently as 2003 the Hawk Zero was resurrected by Testors in its 'Easy Builder' range with a different box and somewhat improved decals. Both examples of box art depict the twin wing guns of the A6M5c but in fact the model only has the single wing guns of the A6M5a & b. These are molded integrally with the one-piece wing and are frequently broken off in the box. Note how the '5' suffix has been dropped from the model designation and replaced with just 'A6M'.
I built one of these kits whilst on leave in the UK in the late seventies, but seem to think I hauled it out of a stash rather than buying it at that time. I painted it with Humbrol's IJN Green from their "Authentics" range - about which more anon (and hopefully not two years hence!) - and decalled it using the "Microscale system" as was, with their very dark, brownish Hinomaru and tail codes for the 254th Ku made up from a Letraset sheet of approximately correctly sized and styled font. The lack of interior was disguised with black paint and a levitating Revell pilot, the neat oxygen masked one from the Hayate and Wildcat kits. It was an early venture into "serious modelling" and I still have it, although when I dug it out recently to examine it did not seem nearly so good a model as I remembered it being!
The markings in the various kits appear unchanged, with 'Yo-110' shown on the Tom Morgan box art but 'Yo-147' included on the decal sheet! The parts are neatly molded with a rash of fine raised rivet and panel detail all over them. The cowling is molded integrally with the fuselage sides with simplified exhause stacks and there is no engine, just a "stopper" to retain the prop. The canopy is crystal clear with sharply defined frames and the overall appearance of the kit as an A6M5a is reasonable and certainly better than some of its predecessors, spoiled only by the poorly shaped spinner. There was no drop tank in the kit - a pity as this was a characteristic feature of comic book Zero iconography.
Incidentally, for those into retro or nostalgia modelling I came across a nice build article on the old Airfix Zero at this Venezuelan website.
Image credits: Box art & instructions ©1967 & 1972 Hawk/Testors; Box art ©2003 Testors
Monday, 26 April 2010
JASIG Cosford Show
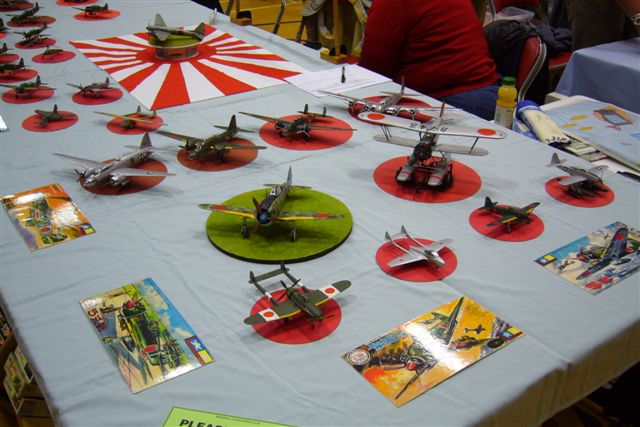
Here are some more images of the JASIG display at the Cosford Show mentioned in JASIG Corner Bulletin # 4 .
Gary Wenko ~ JASIG Leader
JASIG Corner Bulletin # 4
Hi,
It's been quite a show season with many displays behind us now. February saw both Milton Keynes and Huddersfield shows and with the winter we had this year, attending was no small feat. In March we went to Peterborough and Shuttleworth. Shuttleworth had not hosted a model show for decades. In April we took the SIG display to Cosford and just this past weekend, Hinckley. All were a success and a great thanks goes to Paul Bebbington, Tim Cant, John Drummond, Frank Hayes and Peter James, who kindly brought models to make the display what it was. We have two shows left for the first half of this year: Hendon on 23 May and Downham Market on 27 June. JASIG South (hosted by Peter James) may be in attendance at the Salisbury show on Saturday, 29 May. Once summer is passed, we'll be busy again. One of my personal milestones was met at Cosford where we managed a wonderful line up of ten Japanese bombers all to 1/72 scale.
Here are some photos of our members who made these show possible and some of the models they brought along:
Paul Bebbington
Tim Cant
John Drummond
Frank Hayes
You know, the many scale model magazines do a great job now of letting us know what new things are available. I picked up the Alley Cat resin conversion to make the Hasegawa Ki-61 a Ki-100 and thought you might like to see the cleaned up parts that make up the set.
At Hinckley in the competition was the new injection moulded Shinden in 1/32 scale. It's a lovely kit and by today's standards not all that prohibitively expensive for what you get. Here is a link to the site where the kit is on offer and below are a copule of snaps of the model at Hinckley. It really is a cracker.
Unicraft is still on the move with their range of resin kits of paper projects and will soon be releasing a Ki-88, J4M and the Ki-119 in 1/72 scale. I've made some of their earlier offerings and if you like something different be sure to look out for these new ones. Images of the kit boxes are shown below.
Glenn Wilson made this model of the Fine Molds Keiun and provided us with his review:
Fine Molds Kugisho R2Y1 Keiun by Glenn Wilson
This is a kit of a plane more commonly known as the Yokosuka R2Y1 – hence the “Y” in its designation. Its parentage are a couple of Heinkel 119s exported to Japan in 1940 when the Reichs Luft Ministerium (RLM – the German air ministry) declared no interest in this unconventional high speed Heinkel plane – the RLM tended to be a trifle conservative. The He 119 featured a pair of coupled engines mounted behind the cockpit with a propeller shaft running through the cockpit and a glass nose similar to the He 111. A single prototype R2Y1 was built before the war ended, and flew, just once, on 8th May 1945, before being destroyed in an air raid. A second was still incomplete when the war ended shortly afterwards.
This kit belongs to this millennium and features crisp & finely moulded mouldings with engraved panel lines and moulded cockpit sidewall detail accordingly. There is only minor flash. Instructions are in English and copy-righted 2001. Decals are for the single prototype; colour scheme is dark green over orange, as befits its prototype status. The cockpit floor moulding is impressive – who knows if it is correct, but it certainly looks the part – it provides more detail than can be seen through the canopy or windows. The seat backs were very finely moulded; the instrument panel is nicely detailed and does not use a decal – thankfully! I just added seat belts.
I suggest that you glaze the hole in the cockpit floor with Krystal Kleer (other brands are available) and then paint the underside dark grey. I made a wall behind the instrument panel to seal off the cockpit from the lead shot used as nose weight. Once packed with lead I sealed off the 2 side passages under the floor with PVA glue. I used 20 – 25gm of lead under the cockpit floor – it was enough; the instructions say “more than 15gm”.
A single piece bottom wing ensures that the wing dihedral is correct; minor filing of the wing roots was required to remove a small step; the small wing root gap was filled with super glue. The wing trailing edges are as thin as can be hoped for. Under-carriage bays are boxed and include some detail.
The fin is moulded offset to starboard – neatly engineered. Although the original plane had only 4 exhaust pipes, 2 are moulded with the fuselage and a further 4 are provided separately – at least you have spares in case you sacrifice one to the carpet monster. The dorsal air intake is not curved enough to fit tightly all along its length: I cemented the front/middle down, left it to set over night, and then clamped and glued the back half the next day. The weak point of many good kits is poorly fitting canopies, but here the fit is perfect and I just painted MEK (methyl-ethyl-ketone) along the join to glue it on.
After recent Hasegawa kits I was expecting thick decals but these are perfectly thin, but not too thin BUT they react badly to Microscale Sol. I used Microscale Set without problems after the initial contretemps with Sol! Hinomarus are made from separate disks of white and red – but after destroying mine with the Sol I replaced them from a generic set of Hinomarus from Techmod. As I wanted an “operational” plane (as a worthy opponent of future Tiger Force planes) I painted the underside grey instead of orange, and added the tail markings of a real reconnaissance kokutai from my spares.
Recommended to all skill levels; this kit can be built out of the box requiring only some nose weight and, ideally, some seat belts. It was a quick and enjoyable build.
Glenn Wilson
At this writing the Classic Airframes BR20 with two Japanese options is available from Hannants. "It aint cheap", but it will make a lovely addition to the 1/48 scale line up that begins to dominate our hobby.
Thanks for all of the support and I look forward to seeing you on the show circuit and of course, Scale Model World, 13 and 14 November. Remember, our theme this year is a split one: half of the table will be Japanese Self Defence Force aircraft and the other half will be Japanese aviation of 1940 with a twist: if you're inclined to make something which has an antaganist and you wish to display an aircraft with its adversary, you may. (Sounds like Perrys and I-15's to me.). We hope to parallel the war years, 70 years on. If you are keen, we'll keep this going in years to come. Feedback welcomed!
Take it easy and I hope to see you at one of the shows.
Gary
Thursday, 22 April 2010
Ki-46 Colours Update
Please note that I have added a few more hobby paint comparisons to the Ki-46 Colours blog about Dinah # 2414 and re-formatted that part to bullet points so it is easier to follow. I will continue to add to it as I work through the many available paints so please refer back to the blog for further updates from time to time. I also plan to photograph the plates I have prepared and post in situ to provide an overview of the various colours.
Wednesday, 21 April 2010
Ki-46 Colours
On 18th July 1943 the Mitsubishi Ki-46-II "Dinah", s/n 2414, of Dokuritsu 70th Hiko Chutai was shot down by Sqn Ldr Ken James, CO of 457 Sqn RAAF. The encounter occurred at 27,000 feet about 10 miles north of Coomalie in North-Western Australia and was one of many in the defence of Darwin against the Japanese. The "Dinah" was being flown by the CO of the 70th, Captain Sasaki Shunji, 26 years old, with Lt Akira Eguti as his observer. Both officers were killed, apparently attempting to bail out of the aircraft too low.
Sasaki Shunji
The wreckage of the aircraft was located by three officers of 457 Sqn and subsequently examined by FO Claude Pender, the Intelligence Officer of # 5 Fighter Sector, who submitted a report stating that the general appearance of the Ki-46 "was quite new, probably not having flown more than 30 hours." He also noted that the aircraft was "of grey painted metal, the tail assembly and ailerons were covered in grey fabric." Dinah 2414 had been constructed in April, 1943, so at the time of the encounter was only three months old.
In 1989 the wreckage of the aircraft, still in situ, was visited and examined by Bob Alford and Owen Veal. Owen matched the colour of the paint visible on the undersurface of the wing using Humbrol paints to the formula shown here. Unfortunately Humbrol 95 'Concrete' is no longer available but thanks to the good offices of Britmodeller (cheers John!) I was able to obtain a tin to replicate the mix precisely in order to examine and compare the matched colour across various paint colour standards.
The colour is very close in appearance to the brownish or olive grey of Methuen 4D3 and to the Munsell value 5 Y 6/2 @ 1.22*, whilst also being somewhat similar to the RAL colour value 7034 Gelbgrau (yellow grey) @ 2.97. It is almost exactly midway between 16360 and 16350 @ 5.12 and 5.40 respectively but is actually closer to 16357 @ 3.97 than either of these extremes. For those with access to the BS5252F deck it is close to 10 B 21 @ 1.49. These colours are presented in the schematic below:
This colour also appears to be consistent with the "warm grey" appearance of the abandoned Ki-46-II in the colour photograph that heads this blog above. When an earlier Ki-46 of the same unit was shot down on 6th February 1943 by Wg Cdr Bob Foster of 54 Sqn RAF he described it in his combat report as "greyish blue". It is possible therefore that the grey paint had the same tendency to oxidise and "chalk" with exposure as the "olive grey" or "ash green" paint associated with the Mitsubishi Zero, shifting towards a more neutral or slightly bluish grey. A previous blog post with comments about Ki-46 colours from contemporaneous observations can be found here.
In comparison to readily available hobby paints the following observations were recorded.
- Tamiya XF-76 'Gray Green (IJN)' is slightly darker and greener but could provide a reasonable alternative match if lightened with a little white or light grey more towards grey.
- Lifecolor AU 071 'RLM 02 Grey' is too dark and too green.
- Vallejo Air 71023 'Camouflage Beige/Hemp' is too dark and too yellow/brown.
- Polly Scale F414317 'Concrete' is close in hue but a little darker and too brown.
- White Ensign Models Colourcoats ACJ16 'Mitsubishi Zero Grey-Green' is a little too dark and still too brown.
- Gunze (GSI Creos) Aqueous Hobby Color H70 'RLM Grau 02' is similar in hue but just a little too dark and too much towards grey. Lighten with white and add a touch of yellow ochre.
- Testors Model Master 2071 'Grau RLM 02' is also similar but again just a little too dark and to much towards grey. Lighten with white and add a touch of yellow ochre; a trend emerges.
- Tamiya XF-14 'J.A. Grey' is too light and too yellow/green
The reality is that none of these paints straight from the bottle or tin are close enough representations of the colour. For those who wish to replicate it using Humbrol paints the discontinued # 95 'Concrete' may be substituted with 28 parts 103 'Cream' + 17 parts 34 'White' + 1 part 101 'Mid Green' , but this is suggested very much on an 80/20 basis and I have not tried it myself!
The interior of 2414 was found to be a dark blue grey, described as being a colour somewhere between Humbrol's 67 'Tank Grey' and 79 'Blue-Grey'. This is a significant observation as it confirms that the interior of this particular aircraft was probably painted according to the prevailing JAAF regulations at the time of construction and provides a useful precedent for the interior colour of a type where it has not been known before. Curiously the interiors of the engine cowlings were also painted the same dark grey. The partial interior of the observer's station and interior of the engine cowling are shown below.
The photographs below provide other views of the sad wreckage of this most elegant of reconnaissance twins where it has remained since 1943.
With sincere thanks to Bob Alford for kindly sharing this information and the images.
(* Using the DE2000 colour difference calculation where 2.0 or less equals a close match)
Image credits: Photographs of 2414 and Humbrol colour chip Bob Alford & Owen Veal; Heading photo Albert F Makiel Collection via Koku Fan; Rendered colour chips ©2010 Straggler
Subscribe to:
Posts (Atom)