Saturday, 14 November 2020

Jason Brash's 1/72 Kawasaki Ki-45 Toryu

 
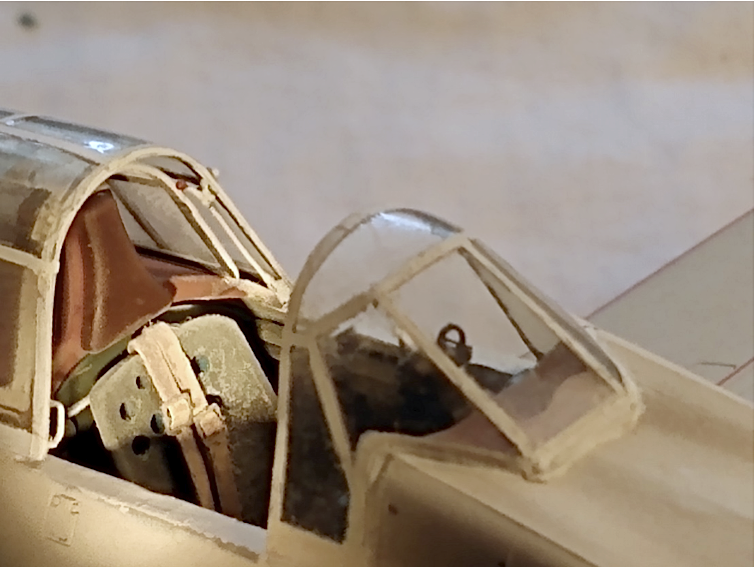
Jason Brash from Australia is another returnee modeller who has been busy building excellent models of Japanese Army and Navy aircraft in 1/72 scale and has very kindly shared images and details of his various builds. His Kawasaki Ki-45 Kai Ko (the Type 2 Two-seater Fighter  - Ni Shiki Fuku-za Sento-ki  - 二式複座戦闘機) is built from the splendid Hasegawa kit # 00810 released in 2006 and represents an aircraft of Hiko Dai 13 Sentai in Japan during the Autumn of 1942 prior to the unit departure to the New Guinea theatre.  In Jason's own words then:-


'I really enjoyed building Hasegawa's 1/72 Ki-45, everything just fell together and the lines of the kit look spot on. This Kai Koh was painted up to represent an aircraft of the 13th flight regiment based on the Japanese mainland, 1942.
 
 
'The build was for the most part completed out of the box. The only additions being the Eduard Kawasaki belts and a Yahu Instrument panel.Though the kit decal performed well, the only ones used were a few stencils and the tail unit markings. The majority were applied with the airbrush. 
 
 
'The paint used throughout is an Australian brand called SMS (The Scale Modeller Supply) which are Acrylic lacquers. They are airbrush ready, mix well and dry fast so these are my go to for pretty much any project these days. The other plus with these paints is the active community on Facebook who are happy to help with advise or tips and tricks. 
 

'For the interior & wheel wells Olive Drab was used, highlighted with light grey and washed with a black/brown mix of Tamiya panel liner.  The exterior was first sprayed black, then highlighted with white creating a marbled or mottled surface. A very thin brown was applied to certain areas to help warm up the tone prior to the Grey-Green being applied again in a marbled effect. I then thinned that colour with white, highlighted panels and finally blended it all with a thin coat of the Grey-Green over the top. 
 

'The smaller details were painted next, the control surfaces were painted with British silver grey, leading edge IFF strips with Trainer yellow and  Hinomaru  painted with Red. The chipping was hand  painted using an 0/5 brush & Vallejo silver, then panel lines were carefully picked out with a custom mix of Black & Brown Tamiya panel liner. A final coat of Satin clear varnish, some pigments for exhaust and dust staining and it was time to call it a day. 
 

'One of my very favourite aircraft that was both fun and enjoyable to build.'


With special thanks to Jason for sharing these images and details of his excellent Ki-45 model and others to follow. As an aside, for those who have not seen a scale model of Toryu relative to other twin-engined aircraft its small size always surprises. The Type 2 designation has in the past resulted in some confusion with the Type 2 single seater Ki-44 - Shoki - in books or unit and operations records.

Image credit: All photos © 2020 Jason Brash

Thursday, 5 November 2020

Gone But Not Forgotten - Revell's Classic Donryu

The Revell Nakajima Ki-49 Donryu (Helen), the Type 100 Heavy Bomber (百式重爆撃機 - informally '100 shiki ju-baku')  was one of several iconic Japanese aircraft kits released in the early 1970s which provided the only mainstream injection game in town for type and scale for many years. It was well received when issued as kit H-102  in 1973 with the collaboration of Takara in Japan (?) but has suffered the fate of many a classic by tending to be increasingly dismissed by pundits, partly due to its supposed inaccuracies, its raised rivet detail (albeit which is commendably fine) and of course the release of the very fine Hasegawa Donryu in 1998.

Most examples of the original release appear to be in the stronger Revell Japan box with all instructions in Japanese but confirmation as to whether flimsier boxes with English language instructions ever existed would be welcome. According to a review of the kit in the March 1981 issue of Air International magazine only three of the quintet of Revell Japan kits were issued by Revell (UK), Toryu, Ginga and Gekko, with the Donryu only available from specialised dealers as a Japanese import. It was a quality product for the time with a separate leaflet of colour printed markings schemes as shown here (the scanning has rendered as light grey the original silver metallic ink used to represent natural metal) and a comprehensive decal sheet with insignia for no less than nine examples from eight units operating the type, including some multiple Chutai colour options as follows:-

  • Hiko Dai 62 Sentai - insignia included for 1st, 2nd and 3rd Chutai in overall light greyish-white with dark green mottle on upper surfaces as box art
  • Hiko Dai 12 Sentai - insignia for 1st Chutai in natural metal with dark green mottle on upper surfaces
  • Hiko Dai 95 Sentai - insignia for 3rd Chutai with options for a solid dark green upper surfaces over light greyish-white under surfaces or in overall light greyish-white with a dark green 'tiger stripe' camouflage pattern on upper surfaces
  • Hamamatsu Army Flying School - school insignia in yellow with three horizontal bands across fin and rudder or in red with a single red rear fuselage band, both in overall natural metal finish
  • Hiko Dai 7 Sentai - in overall light greyish-white with dark green mottle on upper surfaces
  • Hiko Dai 74 Sentai - insignia for 2nd and 3rd Chutai in overall natural metal with dark green mottle on upper surfaces
  • Hiko Dai 61 Sentai - insignia for 3rd Chutai in a design usually associated only with the unit's Ki-67 aircraft in solid dark green upper surfaces over light greyish-white under surfaces

Unused decal sheets in unbuilt kits have often yellowed or become stained and in some cases marred by craquelure with the risk of breaking up when softened in water. For that reason aftermarket alternatives are particularly welcome and hopefully there will be more!


The kit itself is neatly moulded in silver plastic with a fairly detailed interior for the time, consisting of floor, bulkheads, seats, control columns and instrument panel. The configuration is not accurate as the tunnel to the nose position is central with a full span instrument panel and dual control sticks rather than the actual arrangement of the tunnel on the right with a truncated instrument panel and the co-pilot's control yoke on an extension from the pilot's control stick. The floor incorporates a bomb bay with four separate bombs but the bomb bay doors are moulded as a single piece. The nose interior has a prominent central seat, incorrect to the actual configuration of a folding seat on the right side, and  incorporates a bomb sight and machine gun. Additional machine guns for the ventral, waist and tail positions are included with a 20mm mounting for the dorsal position. The weapon was mounted to the right of the gunner as on the Hiryu but rather than a fully revolving turret the canopy had to be opened for the mounting to revolve and the weapon to fire. The ventral position is actually better defined than in the Hasegawa kit. Engine rows are separate parts, the cowlings are finely moulded with the flaps as a separate piece and the larger under cowling oil cooler intakes are included with a note to omit them to represent the earlier Ki-49-I. The props and spinners are single piece mouldings with the broader blades of the II.  The undercarriage components are well represented. 

On the version differences the production development of the II series has as usual become confused with the Ko, Otsu, Hei suffix sequence, the terms being attributed to airframe and ancillary differences rather than armament as intended. The II Otsu had improved armament of Ho-103 (Army Type 1) 12.7mm machine cannon in nose, waist, ventral and tail positions with a Ho-1 20mm machine cannon in the dorsal position. The II Hei was equipped with Dempa Keikaki radar as special equipment. 

There was a point by point comparison of the Revell and Hasegawa Donryu kits by Peter Fearis in Issue 2, Volume 5 of JAS Jottings (the quarterly magazine of the IPMS UK Japanese Aviation Special Interest Group. The unsurprising conclusion was to leave the Revell kit to collectors and to build the Hasegawa one. The above mentioned Air International review was less dismissive and summarised the original Revell release as follows:-

'The Donryu kit consists of 84 component parts, including 12 transparencies, and all fit together well. The interior is well reproduced, with a floor extending from the nose to the ventral gun position on which are mounted seven seats and other features. The transparencies are extensive and very clear. Both cylinder banks of each engine are separately formed and the undercarriage is nicely in scale proportion. The decal sheet which offers the correct shade of red for the hinomaru, offers markings for nine  different aircraft in a variety of finishes, each aircraft being illustrated in full colour in a four page leaflet which supplements the all-Japanese instruction sheet. The lack of an English translation is of no importance as the diagrams render everything abundantly clear. Commendably accurate, this kit is well worth obtaining, although we can offer no details of price or current availability.'    

In 1980 the Donryu kit was re-released in a flimsier box as S35 (although retaining H-102 as a sub-designation) with new artwork as shown above, instructions and decal options, the parts being moulded in light grey plastic but otherwise unchanged. The instructions, again in Japanese only, included a reference to Takara, inviting purchasers to contact their service centre with any questions, providing a Tokyo address and telephone number.  Colour call outs were for Revell (Japan) paints which share catalogue numbers with the subsequent Gunze Sangyo paint range.   


The colour schemes and markings offered in the kit were significantly reduced from the original to only three options with illustrations printed in monochrome and as follows:-

  • Hiko Dai 95 Sentai - insignia for 3rd Chutai in overal light greyish-white with dark green 'tiger stripe' camouflage on upper surfaces as box art
  • Army Air Communications School, Mitominami (Mito South) - in overall natural metal finish
  • Unknown Army unit - no insignia in dark green and brown kumogata camouflage on upper surfaces over light greyish-white under surfaces. Paint colour # 16 IJA Green was cited for the dark green whilst the brown - given as dākuburaun (dark brown) in Katakana - was to be mixed from # 43 Wood Brown plus # 7 Brown but no ratio was suggested. Paint # 56 IJA Gray Green (Nakajima) was cited for the  light greyish-white. 
 
 
Joyful Revelldom - Donryu from the 1976 Revell Japan catalogue

Notes on Donryu Camouflage

Whilst the modelling consensus is to usually depict Army mottles on predominantly natural metal finishes the evidence is that they were also applied to solid grey green or in some cases light blue or light brown base coats. And the solid base coats were not always applied as an overall finish but sometimes limited to the upper surfaces only with natural metal retained on the under surfaces. The reason for this variance, even for aircraft within the same unit, is obscure but probably expedient and related to the availability of paint and/or the urgency required in preparing replacement aircraft for operational use. Monochrome photographs tend to obscure these nuances but even some colour photographs have been misinterpreted as a result of conventional beliefs. 

Pioneer colour researcher Donald W Thorpe* recorded Donryu schemes inconsistently, summarising N (overall natural metal), O1 (Overall A9 Light Grey), B1 (A1 Dark Green mottle over overall A9 Light Grey), S3 (A1 Dark Green upper surfaces over natural metal) and C3 (Alternate segments of A1 Dark Green, A3 Green and A12 Brown upper surfaces over A5 Light Grey Green lower surfaces. However the colour profile captions in the book additionally suggested B2 (A1 Dark Green mottle over overall A10 Light Blue Grey), B3 (A1 Dark Green or A2 Olive Green mottle over natural metal), B4 (A1 Dark Green mottle over overall A5 Light Grey Green) and S2 (A1 Dark Green over A9 Light Grey lower surfaces) as probable schemes. With some points of reconciliation these eclectic combinations now appear viable for Donryu together with his C4 (A1 Dark Green and A12 Brown kumogata over A9 Light Grey lower surfaces). 

Model Art No.329 'Camouflage & Markings of the I.J.A. Bombers' published in Japan in 1999 does not materially challenge those suggestions. For those not familiar with the appearance of the Thorpe alpha-numeric categorisations a colour chart with sRGB chips rendered from his original Munsell notations and additional notes is available on request as a PDF from this author.

Light greyish-white (明灰白色 - mei hai (or kai) haku shoku) is a long standing Japanese convention often used to describe both Army grey-green and Navy grey in kits and reference books, unfortunately persisting to this day as it is not characteristic of the original appearance of either colour. 

What's In A Name?

Donryu is commonly translated as 'Storm Dragon' in English, but the origin of that interpretation is obscure. In his 1997 Schiffer monograph on the type Richard M Bueschel named it 'Dragon Swallower'. However the characters 呑龍 mean 'Gulping Dragon'. Although Donryu was developed in 1940, the Imperial dynasty year 2600, it was officially adopted by the IJAAF in 1941 which should have resulted in its designation as the Type 1 Heavy Bomber. But as 1940 was a memorial year of national celebration, the IJAAF assigned it instead to 2600 and designated it the Type 100 Heavy Bomber. 'Gulping Dragon' sounds bold but in fact was taken from a very gentle monk 'Donryu' of Joudo-shu (a branch of Buddhism) who took care of and educated poor children during the Edo era. The Type 100 was named after the 'Daikou-in' temple, commonly known as the child-raising Donryu shrine in Ohta City, Gunma Prefecture, where the Nakajima factory was located. With very special thanks to Keishiro Nagao of Lifelike Decals for his kind insight to this aspect of the aircraft.


Ki-49 English Language References

Scale Modeler Vo.9. No.7 July 1974 - eight page review of the Revell kit including type history, 3-view plan (no scale) and eight monochrome profiles

Air Forces International January 1980 - three page article with 1/72 scale plans and three colour profiles; list of FS 595a equivalents to Japanese Army Air Force colours

Air International Vol.20 No.3 March 1981 - review of Revell kit with six colour profiles by John Weal

Nakajima Ki-49 Donryu in Japanese Army Air Force Service by Richard M Bueschel, Schiffer, 1997 - 59 page type monograph with photos and tables

JAS Jottings Vol.7 No.1 February 2001 - seven page type history with 3-view plan (no scale) and five monochrome profiles

Arawasi International Issue 9 Apr-Jun 2008 - 14 page type history with colour and b/w photos, six colour profiles and two colour plan views by Mark Rolfe, colour cockpit layout schematic and several tables


* Thorpe, Donald W., Japanese Army Air Force Camouflage and Markings World War II, Aero Publishers Inc., 1968.

Image credit: All © 1973 & 1980 Revell (Japan)

Monday, 2 November 2020

Kevin Bade's 1/72 Donryu

Pursuant to the review of Rising Decals Donryu set there was only one respondent to the invitation for photos of Donryu models with Kevin Bade kindly sharing these images of his splendidly broad-shouldered Hasegawa 1/72 scale Nakajima Ki-49 'Helen' in Hiko Dai 62 Sentai, 3rd Chutai guise. The model was painted with a base coat of Testors aluminium then Aeromaster IJA Grey and Green using his 'trusty old Paasche H model airbrush'.  

After service operating the Ki-21 'Sally' from July 1939, the 62nd transitioned to the Donryu at Obihiro, Japan, during December 1943 and January 1944 under the command of Lt Col Nobumasa Haga. After supporting the 63rd Sentai's move from Hokkaido to New Guinea the unit moved to Saigon in Indo-China for participation in daylight attacks from airfields in Burma which proved disastrous. After preliminary losses to Allied ground attacks reduced aircraft strength to eight the unit re-organised at Sungei Patani, Malaya, with a dual component of the Ki-49 for daylight sorties and the Ki-21 for nocturnal sorties. The night attack unit was commanded by Capt Tsutomu Ohshita.  On 27 March 1944 nine Ki-49s sortied for a daylight attack against Ledo but failed to locate the target in conditions of heavy cloud and were then attacked by P-51 fighters, losing eight aircraft in quick succession. The only surviving Ki-49, flown by 3rd element leader 1Lt Akira Ohno, force landed in friendly territory with three dead crewmen. 

In late September 1944 a detachment of the 62nd operated with part of the 12th Sentai as the Karigane unit with nine Ki-21 bombers under Capt Chugo Ito for sorties over western New Guinea and the Philippines, whilst the main unit also conducted attacks against targets in Morotai and Leyte during October and November before returning to Japan in January 1945. The unit was then re-designated as a Tokko special attack unit operating specialised Ki-67 Hiryu aircraft.   

With special thanks to Kevin for sharing these images displaying the distinctive plan form of Donryu to advantage. Comments regarding the translation of Donryu and its characters welcome! ;-)

Image credit: All model photos © 2020 Kevin Bade

Friday, 30 October 2020

Zoukei-Mura 1/32 Toryu by Dean Large


It is a privilege to be able to share these images and details of the Zoukei-Mura 1/32 Toryu Ki-45 Kai Ko as built by Dean Large and featured in Airfix Modelworld magazine. This impressive large scale kit is available in two versions in Zoiukei-Mura's Super Wings Series, kit SWS No.13 offering the Tei interceptor or Hei/Tei air-to-air ramming variant and kit SWS No.14 offering either the Ko or Hei interceptor variants.  


On receipt of kit SWS No.14 Dean was impressed with no less than 25 sprue frames of parts and a 60-page long instruction manual. Having decided against using the optional clear parts for the fuselage, wings, tailplanes and engine nacelles Dean was left with an approximately 400 parts build and elected to complete the kit as the Ko version.  

Construction began with the engines, each of 28 parts, and Dean noted an extent of detail provision that would not be visible with the model complete. The tubular mouldings such as pipes, exhausts, pushrods etc., had prominent mould seams and needed cleaning up before assembly. The other engine parts such as the banks of cylinders, carburettors and gearboxes required only minimum clean up. Once cleaned up all the parts fitted with click-together precision. The engine was painted with AK Xtreme Metal Steel followed by a black pastel wash. The carburettors and other ancillaries were finished in Tamiya XF-53 Neutral Gray with details picked out in AK Aluminium. The exhausts were first painted steel and then given a matt coat before successive layers of pastel washes in reds, browns and blacks, etc., to give a rusted and weathered appearance, then fixed with a second matt coat to prevent smudging when handling. 


For the very detailed cockpit Dean decided not to follow the instructional construction sequence requiring the cockpit floor to be attached to the single piece main wing spars. That  17” long structure would have made the cockpit assembly rather unwieldy to handle while adding the small details later. Dean decided that sub assemblies would be the best approach, with the whole structure only being brought together at the last minute before insertion into the fuselage. That meant a large number of cockpit parts would remain loose so a number of small plastic containers were used to keep the parts together and prevent losses, duly labelled of course. Dean followed the instructions to paint the interior 'late war khaki' but added Hobby Color H52 Olive Drab to H81 Khaki to achieve a greener effect matching photos. Notwithstanding the ZM instructions an interior colour of dark blue-grey or grey-green would probably be more typical for the Ko. Dean completed the interior with all the parts provided but noted that much of the detail is invisible once the model is completed and that many parts could be omitted to speed assembly without compromising the final result. 


There are three methods of presenting the instrument panel; by painting the raised detail on the plastic part, by applying an instruments decal, or by using the clear part. Dean chose the latter and masked off the openings for the dials and readouts, painted the panel black and then added the instrument decal from behind to show through the clear faces. Microscopic masking was needed for that - fortunately the majority of the dials being the same diameters as some of the punches in a miniature punch set allowed tiny discs of masking tape to be punched out for the purpose. More irregularly sized and shaped openings were masked with tiny blobs of Blu-Tak teased into position with the point of a cocktail stick. Switches and other details were then painted on with a fine brush and a steady hand. 


There was a similar situation with the twin Ho-103 nose armament,  unseen once the nose cone was assembled and if the inspection panels were fitted closed. The nose cone proved slightly too wide in diameter for the fuselage, leaving a step, and the sides of the latter had to be built up with layers of brushed on primer as filler. Dean used the optional transparent nose cone as a sacrificial 'dummy' to sand the fuselage to achieve a perfect match, thereby preserving the surface detail on the solid nose cone. 

According to the instructions, the undercarriage assembly needed to be fitted before the top wing halves were added. This seemed to Dean to be inviting their accidental removal later in the build, so he conducted tests to determine whether they could be fitted after the main airframe was assembled. The answer was yes, even after the engine nacelles were fitted, but only if the gear doors were added beforehand as these would not go in afterwards. The undercarriage itself is very sturdy and well braced, with amazing levels of detail up to and including separate brake pipes to add. Curiously the tyres were not moulded to simulate weight on them, so this was done by careful filing. 


The wing halves were added by locating the full length wing spar into the recess inside the wing half. This gives the correct dihedral angle automatically, with no warping. The top wing half was then added, and again fit was exact, the complex curves of the wing root fillets simply clicking into place. Their fit was so perfect that it was actually difficult to remove them again without damaging them, so a bead of liquid poly was run around the joints to fix them in position. Ailerons and flaps were added, and showed a similar precision of fit. The tailplanes and the fin also fit perfectly into their recesses too, with no filling necessary. One thing to note is that part of the tailplane and fin is visible through the open tailwheel well as it forms the roof of this structure. This means it has to be painted in the interior colour before assembly, as otherwise bare plastic will be visible and this is not mentioned in the instructions.


Once the main airframe was together, it was time for a coat of Mr Surfacer 1200 grey primer to check that joints were satisfactory with only some tidying up was necessary here and there. The rear cockpit was masked with tape for the primer application, and the front cockpit was masked using the ‘closed’ version of the windscreen and canopy as it was an excellent fit and would not be needed for the completed model. The rear fuselage and outer wings were sprayed in Mr Surfacer Base White primer rather than using the decals provided for the Homeland Defence 'bandages'.  The instructions mention that the white wing stripe decals need 3mm trimming from each side before fitting for the option chosen, and when the painted wing stripes were measured to accommodate this it was noticed that the decals for the yellow leading edges would then not meet up with the white stripes as required, so could not be used. That necessitated the yellow areas being painted too, and it was fortunate that this was noticed before the camouflage went on as yellow is notoriously difficult to paint over darker colours.


Mr Color C128 was used for the Imperial Japanese Army grey, and C130 for the dark green reticulated camouflage. These are lacquer paints, requiring thinning with Mr Color Levelling Thinner, and the first stage was to cover the entire airframe with the grey, simulating the aircraft’s appearance as it was delivered from the factory. The green patches were then airbrushed on freehand, without masking, but this approach caused a significant amount of green overspray between the patches. Whilst other builders have seemed content to leave this be, Dean felt that it was overscale and reloaded the airbrush and to clean up the grey areas. A glosscoat of Tamiya X-22 thinned with Mr Color Levelling Thinner was then applied to ready the airframe for the decals. 


Weathering was added with a medium grey chalk pastel wash on the lighter undersides and the white stripes, with a black wash on the darker green areas above. A very thin mixture of black and brown was then applied in subtle streaks at random on the underside to simulate grime and provide some variation to the large area of grey. A coat of matt varnish sealed everything, followed by a little grubbying up around the exhausts and wing root walk areas using powdered chalk pastels. Weathering was kept deliberately light, as a ‘used-but-serviceable’ look was intended.

With very special thanks to Dean for sharing his images and details of the build here. 

Image credits: All photos © 2020 Dean Large


Tuesday, 6 October 2020

Holy Humbrol, Batman! - or A Whiter Shade of Pale (Grey)


Aviation of Japan's Texas correspondent Mark Smith has very kindly contributed his remembrance of building the classic Tamiya 1/48 scale Mitsubishi A6M2 Model 21 kit of 1973 with its mei hai hakushoku (明灰白色) - light/bright ash white colour following the convention of the time. Sadly the ameiro wars are still with us but more happily the adage 'It's your model!' prevails and whether butternut or whitewash battledress is chosen a Zero model is a Zero for all that. And in this case a very fine model which belies its 40 odd years of survival. Over to Mark then:


'The Tamiya 1/48 scale A6M2 Model 21 Zero released in 1973 was a real revelation for its day.  It would be over twenty years before Hasegawa attempted  a better one, and even then . . . not by much.   I remember how much I enjoyed making it, and especially trying to re-create the cockpit.  This happened after college, when life had settled down and I’d just returned to model-building.  The wonderful Monogram T-6 had lured me back around 1978; I could build it as an SNJ in Navy Yellow, and make it as a gift to my Dad.  Halfway through that build, though, I was already itching to get started on that Tamiya Zero.  The particular subject was never in doubt, having (probably like every other reader of this blog) read 'Samurai' by Saburo Sakai in high school, and then there was that dramatic box art of V-103 (shown above) straining at the leash among its Tainan Ku brothers-in-arms - still inspiring. 


'Most of the extra work invested in this model was inspired by Japanese Cockpit Interiors Part 1 by Bob Mikesh (Monogram Close-Up 14, Monogram Aviation Publications, 1976) and a couple of Bunrin-do FAOW (Famous Aircraft of the World) titles on the Zero.  This was 1979, and resin and photoetch details for models weren’t on the horizon yet.  The Tamiya cockpit detail was very good to start with; a few items I added look better for the need to make them from scratch, but most look crude by comparison with what is available now – or for that matter, what Tamiya provides the modeler in the box with their newer tool 1/48 Zeros.  


'I’ve also moved seven times since building this model.  Things got gradually crooked or missing, and I was better at building them than repairing them.  (Aileron mass balances?  Uh, V-103 didn’t have those – or it doesn’t anymore).  Well, none of us liked (or will) turning forty.  Also, even models ‘protected’ against dust all their lives . . . weren’t.  It had suffered for my insistence then on a flat finish, which besides absorbing the dust has betrayed the fuselage seams, as the putty I had depended on then expanded, shrank, or cracked.  Somehow, though, the original sprue aerial for the antenna made it through all those moves.    


'This was the first model I airbrushed, and for dedicated Japanese colors, there were a few Humbrol and Pactra paints; I used Humbrol A/N2 from their Authentics range for the overall colour.  For you youngsters A/N meant Army and Navy.  I don’t remember the Pactra Authentic paint being much different. As the next couple of decades unfolded, it would take a lot to convince me – a lot of everything: time, rationale, photographs, arguments, common sense, colorimetry, relics - how different the familiar Humbrol and Pactra shades were from IJN standards and factory applications. To be fair, though, it was like trying to convince a man raised on the Texas Plains that the earth is round.  The late Jim Lansdale’s work on j.aircraft.com, and the Japanese researchers whose work he presented, was so well-documented and wide-ranging that it couldn’t be dismissed.   This blog was a big help in further explaining early Zero colors, subsequently well presented in Nick's 2010 pdf 'Painting the Early Zero-Sen: A Primer for Modellers & Artists'* and his 2017 Guideline Publications Combat Colours 9: 'The Mitsubishi Zero'.    


'Several years ago I heard that Nick was looking for tins of Humbrol A/N2. As paint, the Humbrol was superb then, and regardless of changing paradigms, I wish I still had some as well.  This is all I have left of mine, though, besides what is on the bottom of a Mania B5N2 Kate.  So I’m resurrecting it in these images, if a few years late.  At least the cockpit colour is close!


Above, in its natural habitat - incandescent light

'This blog is also a place where old models are still welcome, however, and where no kit is discounted because it might have been supplanted by a slightly better one.  More than forty years on, this one is still very much worth buying and building, and a bargain to boot.  But please, Mr. Tamiya . . . doesn’t that sparkling new 1/48 P-38 kit need a new-tool Model 21 counterpart?'   


With special thanks to Mark for this trip down memory lane - with excellent visual aids - and I wholeheartedly endorse his comment about old kits being welcome. I used the Pactra IJ21 Grey paint on the first Hasegawa Zero model I built - from their first generation 1/72 kit. It is slightly lighter than Humbrol's HJ2 Grey but both were matched to the A/N.2 grey in the 1964 IPMS 'Color Guide for Japanese Aircraft 1941-45'.  The whiteness of the colour surprised me but accorded with most of the depictions available then including the evocative Keith Ferris painting - 'Wounded Samurai' - which adorned the Ballantine Bantam books 'Samurai!' paperback cover in 1977. Somewhat surprisingly both paints measure as Munsell Yellows - albeit of very low saturation - and are not pure neutral greys of black and white only. The compiler of the IPMS guide Charles "Chuck" Graham had based them on artifacts assumed to be from IJN aircraft in junk piles at or around Chinhai, Korea during 1946-47 so they probably represented faded or chalked examples of the original paint. To match the HJ2 paint which is no longer in the Humbrol range requires mixing 94 (!) drops of 34 Matt White with five parts of 27 Matt Sea Grey and one part 186 Matt Brown. With foresight Humbrol's Deck Bleached Teak from their Naval Vessels set might have been a better choice but that is no longer part of the range either! The original issue of the Tamiya 1/48 kit preceded their own paint range - at least the instructions simply called out 'light grey' and did not give a hobby paint reference.   

The Tamiya kit had much to commend it including sharply moulded detail, an optional open cockpit with very clear trasparencies, nicely moulded sitting and standard pilot figures and a well-chosen decal sheet offering five markings options. In addition to the Saburo Sakai Tainan Ku machine expertly modelled by Mark decals were also provided for Yoshiro Hashiguchi's 3 Ku 'X-183', Tetsuzo Iwamoto's 253 Ku '253-102' with its plethora of cherry blossom victory tallies, -110 (Tora-110) of 261 Ku (which featured on the cover of Don Thorpe's 'Japanese Naval Air Force Camouflage and Markings World War II'), and Shigeru Itaya's classic Pearl Harbor attack 'A1-101' from the carrier Akagi.  

* Now expanded to 43 pages with additional information and available to previously registered purchasers free of charge. A Nakajima supplement is in progress and will be available shortly.

 Image credits:- All model photos © 2020 Mark Smith; Box Art © Tamiya Inc., 1973; Book Cover Art © 1977 Keith Ferris via Bantam Books