When I first saw Michael Thurow's excellent 1/48th Ki-45 Kai Tei Toryu model in 53rd Hiko Sentai air-to-air ramming guise I assumed from the figures on display with it that it must have been made from the Hasegawa kit. In fact Michael made the model from the venerable Nichimo kit with various improvements. Now Michael has very kindly contributed his build report to share here. And really the details he has provided will be of interest and use to anyone building the Toryu in any scale.
My affair with the Toryu
by Michael Thurow
To build a Ki-45 in quarter inch scale had been my dream since the 1970s when I fell in love with the Nichimo kit. The plane had a dramatic looks and the model an unprecedented quality for the time. Unfortunately I did not buy the kit then. Later, when the Toryu was definitely missing in my collection of Japanese aircraft of the Pacific War, it was no longer available. I remembered that a close friend who had given up modeling owned an untouched box and I tried hard to persuade him to sell it - with no luck (see later). Finally in the mid 1990s I found a forgotten example of the kit at a hobby shop. It was my quickest purchase ever!
Ten more years passed before I found the right moment to start. Meanwhile, although Hasegawa's excellent Toryu variants had been released I stayed faithful to the Nichimo kit. Firstly, because I owned one after a long quest that had connected me with the model and secondly, because I still consider Nichimo's surface representation much superior - thousands of sunk rivets make it look very realistic.
In many other aspects, however, the kit is no longer state-of-the art, and so I obtained and used every available after-market item:
- Eduard 49415 etched detail set
- CMK 4206 resin interior set
- Engine & Things 48136 resin Ha-102 engines (but now Vector seems an even better choice, see my comment below)
- Falcon No.34 vacform canopy set
- True Details 48081 wheel set
- Fine Molds AC48 pitot tube set
Finally, strange as it may seem, I did purchase a Hasegawa Ki-45 KAI Otsu, mainly because I wanted the Isuzu fuel truck and considered it a benefit to use some of the redundant Hasegawa parts on my Toryu without compromising that kit, such as:-
- the front cockpit hood in open position,
- the individual exhaust pipes; and
- the clear position lights
Building the model
Not to bore expert modelers with describing every step of assembly I will focus on the most relevant details, difficulties and changes.
As usual I started with the extra engines which I fixed to the existing bulkheads. They fit nicely into the nacelles - so no problems there. The first real challenge came soon: no parts available anywhere that could be used as ring oil coolers for the later Toryu versions. Many ideas came and passed until I found a brass pipe at a local hobby shop, from which I sawed off two open rings, cut and pressed them to the correct diameter. After adding a little detail they look strikingly realistic! Sadly, the narrow nacelle opening, the oil cooler and the spinner obliterate nearly all sight of the fine engines - alright, at least I know that I didn't avoid the effort...


Next
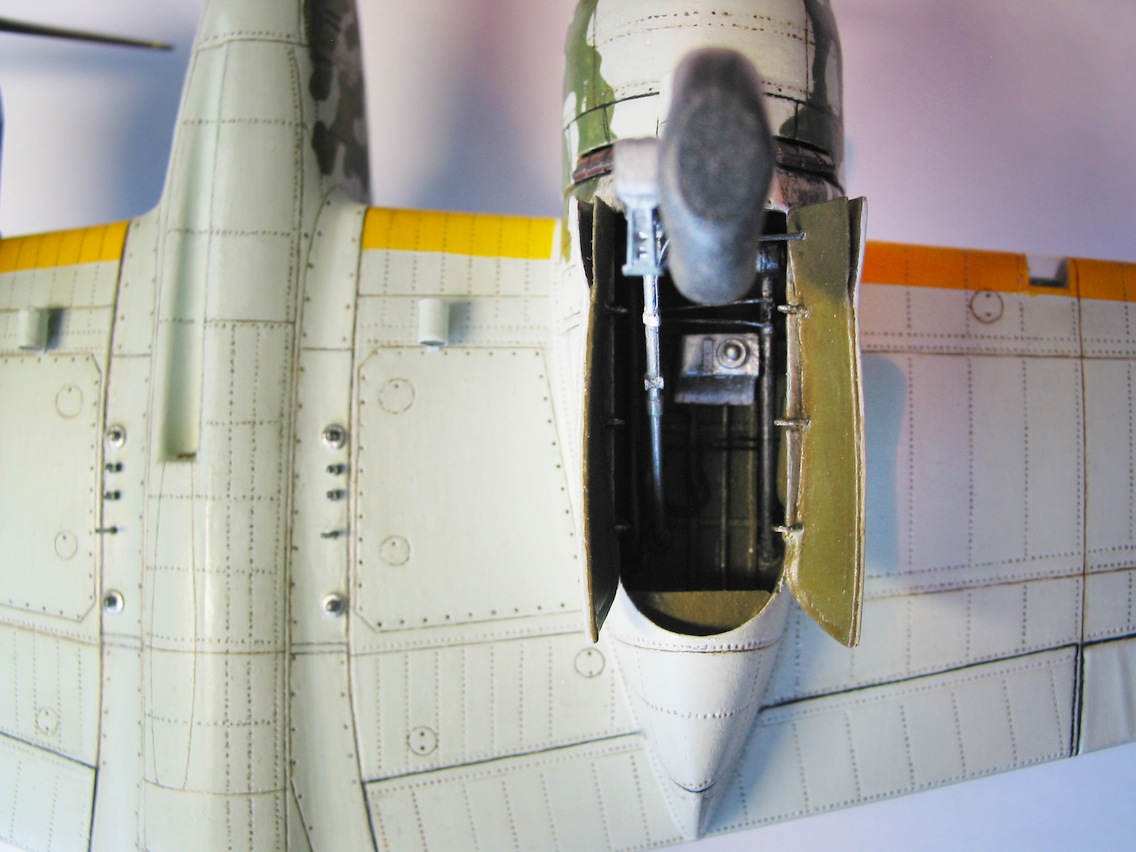
came the wheel wells. The Nichimo kit detail is really not good. So I
embellished the interior with pieces from the Eduard set and with narrow
strips of cardboard and other scratch-built items. The result is fair
enough as rarely anybody ever looks into the openings from below. Be
aware that none of the kits represents the upper wheel strut
construction correctly. Both Nichimo and Hasegawa chose an easy and safe approach
to fixing the struts to the wing base - creating more work for a pedantic like
me.
I went on finishing gears, motors and wings. Here are a few ideas that I implemented:
- Removed the moulded exhaust pipes and replaced them with the individual stacks from the Hasegawa kit which look much livelier
- Removed the solid position lights and substituted transparencies (Hasegawa)
- Removed the solid landing light in the wing root, imitated a lamp and covered it with transparent foil
- Drilled oval air vents into the outer sides of the nacelles, which are missing in the Nichimo kit.
- Fabricated completely new air intakes for beneath engines - the parts provided in the kit are too narrow
- Scraped the bulges into the landing gear doors until they were thin and covered them with a small piece of paper from the inside (in reality hollow bulges were riveted to the outside of the doors to smooth the air flow behind the intakes)
Fuselage
With the wings completed and painted (!) I set about improving the fuselage. The CMK forward and rear cockpit set is great and with some adjustment the parts fitted well inside the fuselage except for the Eduard instrument panel. It took me an hour of scraping to thin down the cockpit walls to provide enough room plus cutting off as much material from the instrument panel as possible before I could squeeze it in - risky work as the walls ended up as thin as paper! The only detail to add was some electric wiring which was quite profuse.


I was almost ready to merge the fuselage halves when tragedy struck, a real modeler's nightmare which - hopefully - happens only once in a lifetime.. I had left my magnifying lens in such an unfortunate position that the summer sun shone right through it onto the port fuselage and damaged it badly - all warped and twisted with no chance to repair it. My mind raced for a solution. Hours of search on the internet but no Nichimo kit could be found. Use the Hasegawa fuselage (and start over again) or use part of it and struggle to rectify with the mismatch? Not good! Then, close to despair, a flash of inspiration - the kit in my friend's treasure vault! A call, a real friend - "I don't want you to throw yourself under a train" and a 400 mile round trip to pick it up. Oooff...
After all I was lucky because the damage began right behind my finished cockpit so that I could cut the tail section off and replace it. A careful operation, but successful!
Some more improvements that I made on my way to completing the fuselage:
- None of the canopy sets is completely satisfactory, so I used a wild combination of the available transparencies from Nichimo, Hasegawa and Falcon
- Drilled a hole in the nose
- Added stubs and pipes (for bombs and external tanks) to the mid wing section
No. 98 of the 53rd Hiko Sentai
Now it was time to decide which specific aircraft I wanted my Toryu to represent. After some deliberation I decided in favour of # 98 of the 53rd Hiko Sentai because it was configured for air-to-air ramming attacks and therefore unarmed (less work for me!) and - with the karimata arrow - a fitting example of this dramatic aircraft.
John Haas, whose excellent Ki-45 Kai Tei model can be admired in the
May 2015 blog entry, seems to have come to the same conclusion earlier. The history of the 53rd Hiko Sentai is well described in that article. I would like to add some information which derives from my own research and analysis of this particular aircraft.
Camouflage
For the light grey-green base coat I mixed my own colour until I liked the tone, but I could not have replicated the process - luckily the colour lasted until I had finished... The dark green mottle was accentuated with an occasional black green blotch to imitate the irregular intensity of spraying and give the surface more depth. I tried to stay as close as possible to the original picture when I mottled the left rear fuselage. # 98 would probably not have flown much before her ultimately fatal mission, so you may want to apply only a minimum of chipping and a little weathering from exposure.
Markings
Here are my thoughts. None of the unit insignia of a stylized '53' from various decal sources have the correct shape as seen on this specific aircraft. Consequently I created my own one from bits and pieces. Note that the white border to the emblem is not painted on the rudder part. The tips of the arrow might be red like the rest of the marking rather than yellow. The three bars in the bulb are lighter - perhaps yellow which would match the colour code for the 3rd Hikotai. The somewhat darker shadow ring around the Hinomaru probably came from masking the insignia with tape before applying the white fuselage band.
Construction Specifics
This is a shinten seikutai aircraft modified for ramming attacks, therefore no guns were installed (and no gun sight!). Remember to cover/close the openings. Equally the observer's gun, gun mount and seat would have been removed. The antenna mast was shortened to prevent the pilot from hitting it when he jumped from the plane - if he had a chance to jump... And finally the rear cockpit opening was faired over. Photos suggest that there may have been two type of fairings: A canvas cover, and later a piece of fabricated sheet metal. I opted for the former solution. To create the irregular surface of canvas with folds etc. I took a piece of very thin paper (like the air mail paper of old) and soaked it in water before fitting it over the respective area, waiting until it was dry and then coating it with layers of plastic glue. When it had hardened the piece was easy to cut into form. As to the colour I'm strongly in favour of a natural canvas brown or khaki. Pictures of sister planes, however, clearly show camouflage blotches. I think it all depends on where and when the cover was installed - at the front line unit or at an arsenal, before or after mottling - and whether anybody cared for a neat job in view of the short-lived operational life of the aircraft.

Here my modeling journey with the Toryu comes to an end. It would be nice to know what happened to # 98. Was it used in combat? Did it bring down a B-29? Who flew it? A beautiful plane for a desperate mission ... it has a place of honour in my collection.
A Postscript on the Isuzu TX40 Fuel Truck
I built the model from the box. Just the folding-roof supports needed some attention since I didn't use the door windows from the kit. This feature and the colouring were inspired by the photo below. To my knowledge no colour photos exist showing the truck in the IJAAF khaki colour. And, to be honest, I didn't like the idea of having my model appear in this rather dull paint all over.
The dark grey body with the tank (and wheels!) painted in greenish primer seemed more attractive. I'm not a Japanese vehicle specialist and would be interested to know where this 'camouflage' was used - did the bowser serve with the Army or was it a IJNAF blue vehicle with an unpainted tank or a requisitioned civil truck with a tank installed? Whatsoever, it is a nice companion for the Toryu.
References
The Kawasaki Ki-45 Toryu, Profile No.105, René J. Francillon, (Leatherhead 1966)
Japanese Army Air Force Camouflage and Markings WWII, Donald W. Thorpe, (Fallbrook 1968) Slayer of Dragons - The Story of the Toryu, Air Enthusiast Vol.5, (London 1973)
Army Type 2 Two-Seat Fighter “Toryu“, Famous Airplanes of the World No.21, (Tokyo 1990) Kawasaki Army Type 2 "Toryu" Two-Seat Fighter, Mechanic of the World Aircraft 6, (Japan 1993) B-29 Hunters of the JAAF, Osprey Aviation Elite Units 5, Koji Takai & Henry Sakaida, (Botley 2001)
With special thanks to Michael for sharing these photos of his model and details of the build.
Image credits: All via Michael Thurow, model photographs © 2016 Michael Thurow