
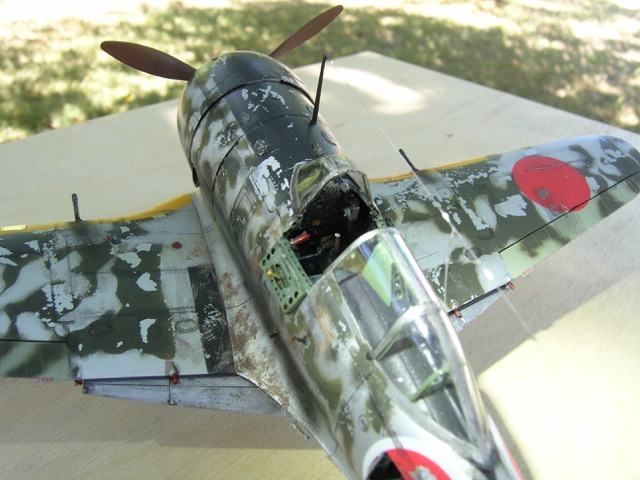
Kevin Burke has very kindly shared these images and build details of his impressive Nakajima Ki-44-I 'Shoki' model built from the Hasegawa 1/32 scale kit and representing a well-used fighter-trainer in classic Akeno Army Flying School scheme. This is Kevin's first model after a 30 year absence from modelling! Over to Kevin then:-

'Beautiful clean, flash free hard plastic moldings secured on bagged trees. This model had the telescopic sight so the front windscreen would be unique to this model. Straight forward construction was enhanced with the Eduard interior and exterior sets for the Ki-44. These are beautiful and the interior kit is worth the cost just for the pilot seat itself.

'Vallejo paints were used for the interior colours and exterior mottling. I added the shoulder harness from the Eduard interior set, some say the IJA did not have shoulder harness, I say, why not, and added it anyway. Seat is very accurate and in scale. Most interior parts were broken into sub-assemblies and added in time. Engine was constructed and wiring was added from Eduard, after closing the fuselage up, it is not viewable.


'Both side entry doors were sawn open and Eduard parts added and painted, but the doors left off until all painting was completed. I decided to open the radio compartment and add radio detail. I cut the opening but really ruined the hatch so I heated up sheet plastic and draped it over the fuselage area involved, trimmed to the proper shape for the hatch and added panel detail. Radio information was gathered on line and a scale transmitter/receiver was scratch-built from plastic bits and a Waldron Punch-set.. The interior was painted and cockpit components added along with radio, wiring and frame work. The mating of the fuselage to the wing section was amazing, almost not needing any cement as it was so accurately tight.


'Very little putty was needed on the exterior of the model. Once most parts were attached and smoothed out a primer coat was applied. I used, believe it or not, Model Master 'non buffing' aluminum out of their spray can and found it an excellent cover. Why use this? I knew it would set up hard and allow me to lift paint chips off the model, retaining the aluminum base. Following the painting instructions mottling was added. This took several tries with my older Paasche H single stage airbrush. Old doesn’t mean bad - just old.


'Once painting was complete, (Micro-Gloss, decaling), I chipped the model using painting tape and applying it then lifting off, forming actual removal of paint chips. That was the reason for the Model Master lacquer base and it worked. Scrapes and muddy boot prints were added to the wing areas. Hand/foot grabs added along with canopy handles. Aerials were stretched sprue with white glue insulators. Micro-Flat sprayed overall. Exhaust was black Tamiya, diluted with white and then a light gray overspray. Chalks were brushed on.


'Aber wing machine guns were added and residue brushed on. Oil and panel lines were Tamiya panel line accent. Much enjoyment in those boxes. The only problem I encountered was the weak tail wheel breaking twice - my fault - and that crazy two-piece telescopic sight through the windscreen. My first kit after 30 years but it won’t be my last. Hasegawa has made an excellent kit!'


With very special thanks to Kevin for sharing these images and details of his stunning Shoki model.
Image credit: All model photos © 2020 Kevin Burke; radio photograph via Kevin Burke
10 comments:
Very impressive build all around, looks great! The weathered mottling is especially well done. Thanks for sharing your work here, Kevin!
Dan
Thanks Dan,
Exceptional Hasegawa engineering on this one. Never put a kit together that fit like a glove. Made it fun again to build.
Regards,
Kevin
Very nice effort Kevin. It is nice to see an early Ki-44-I scale model without the chin air scoop and the wing tanks placed inboard of the landing gear. The method of re-creating the radio hatch was very interesting. I am going to remember that for future reference.
Wind Swords
Excellent detail and an inspiring building process. Thanks for exhibiting this great piece of modelling.
Absolutely masterful work Kevin.
The great work. Thanks for sharing.
But is it possible so "scraped" Hinomaru for the war time?
Not "an after war garbage dump".
Hi Alex,
I have a photo of Akeno Flight School aircraft (2 aircraft) with a starter truck and fuel truck, (no date included),the Hinomaru is scarred and chipped. I understand the debate people have about paint chipping from certain painted areas of Japanese aircraft, but these are chipped. I’ll try to figure a way to add it to the blog. Thanks your your question.
All the best,
Kevin’s
Great-looking build. Pretty wild camo, I like it!
Hi Alex & Kevin
To confirm, photos of Akeno Shoki with scratched and worn hinomaru can be seen in Koku-Fan Illustrated # 79 (1994) including the photo mentioned by Kevin.
Regards
Nick
Well Done !..please don't wait another years you're just too talented :)
Post a Comment