Showing posts sorted by relevance for query interior. Sort by date Show all posts

Sunday, 11 April 2010

Aichi E13 "Jake" Interior Colour

The original IJN finishing specifications for the floatplane Aichi E13 "Jake" called for the interior to be painted with an undercoat of brown enamel and a top coat of light grey green enamel. The latter is presumed to be one of the "hairyokushoku" (ash green) colours in the 'M' series of that name in the IJN provisional paint colour standard known as Kariki 117. The closest Munsell value for this paint colour is 7.5 GY 5/2 with the closest FS 595b value being 24226 @ 2.35 (but which is a little too grey and not quite yellow/green enough). This interior colour also compares exactly to the Thorpe identified colour N4 'light grey green'.


Now some further confirmation of this interior colour has been provided by the appearance of the paint surface extant on Aichi "Jake" wreckage studied by Australian researcher Owen Veal (of the Australian Aviation Heritage Centre in Darwin) and shown here via the kind courtesy of Bob Alford (author of 'Darwin's Air War'). The graded scale presented with the images below shows proportional mixes of the Humbrol paint colours 86 'light olive' and 78 'cockpit green' (the latter paint is usually cited for the WWII RAF interior grey-green colour).


With thanks to Bob Alford for the account of the examination and images.

After I posted this blog Mark Smith kindly reminded me about Ichiro Hasegawa's notes on Aichi interior colours included in the Koku Fan magazine. In May, 1984 Hasegawa-san had reported that "One day a 3-seater Type Zero seaplane was salvaged from the bottom of the ocean off the coast of Kisarazu.  Through a friend of mine I have obtained a piece of metal skin from the salvaged seaplane to which anti-corrosive treatment was given to sustain the color scheme. ... Interior was covered in transparent blue with exception to the cockpit that were painted in yellowish-green."  

In May 1982 Hasegawa-san had referred to the interior of Aichi D3A1 AII-231 which he had illustrated in profile as follows:- "Inside of fuselage had been painted by anti-corrosion paint in bluish color... Inside the cockpit was covered in yellowish green."


There is a faint yellowish tone apparent in the 'M' series colours shown above but we cannot be sure that what Hasegawa-san saw was this paint or perhaps one of the other Thorpe identified interior colours N5 'light olive green' (similar to FS 34151) or N6 'buff green' (similar to FS 14255). 

Image credits: Heading painting ©2010 Shigeo Koike; Rendered colour chips ©2010 Straggler; Kariki 117 chips Summer via Fuku BBS; Aichi "Jake" Photographs ©2010 Owen Veal via Bob Alford.

Tuesday, 11 May 2010

Shiden-kai, Shiden & Kyofu Colours ~ Part Two - Interiors 1


Regarding the interior colour of the N1K1 "Rex" floatplane fighter Rober C Mikesh writes in 'Japanese Aircraft Interiors 1940-1945' (Monogram Aviation Publications, 2000):-

"It was not practical to make a definitive description of the interior green that was found on the two Rex aircraft that were inspected. The aircraft at the Admiral Nimitz Museum has been repainted from the original, and the paint on the aircraft at the National Air and Space Museum (NASM) is so deteriorated that an accurate assessment is not possible under the existing conditions. It is safe to say, however, that the colour appearance appears to approximate the generally used Munsell 2.5 GY 4/2 found in Navy cockpits. This approximates the Pantone 5743U and is shown on page 15 as Color N.33. The instrument panel of the Admiral Nimitz Museum example, and the one separated panel at the NASM, are both semi-gloss black."

Is it safe to assume that this colour continued to be used in the cockpits of the N1K1-J Shiden?


In respect of the N1K2-J  the interior colour match cited by Peter Fearis in his excellent monograph on the type self-published under the 'Kaburaya' title in 2000 (Kaburaya Books Modellers Guide Number One: Kawanishi N1K2-J Shiden Kai "George") is FS 34258. The evidence for Peter's conclusion about the colour is not revealed in the book but he had extensively examined and photographed the extant US Air Force Museum example, airframe # 5312. 

However, Robert C Mikesh, in examining # 5312 concluded that:-

 "no repainting of the interior had previously been made, therefore original. although aged, colors could be examined in the very few areas where deterioration was not too great". 

And that this color:-

 "closely resembled A/N 34, as had the NASM aircraft". 

Mikesh also matched FS 34127 and A/N 34 (from the color identification system used in his book) to "the better preserved color of the interior structure, behind components that were removed" inside the cockpit of the extant NASM example airframe # 5341. 

Mikesh matched the colour of those components (as distinct from the structure) that could be studied as ranging in colour appearance from Pantone 5747U (FS34097) "slightly greener than the color of the structure" to N1. "Most ranged between N1, which was too dark, to N2, which was too yellow". All were described as shades of green but the "mix of very similar colors in a cockpit is barely noticeable, resulting in a strong resemblance to the NASM aircraft". 

Elsewhere Mikesh identifies A/N 34 as Munsell 10 Y 4/4 which is exactly the same value assigned to N5 Light Olive Green by Donald W Thorpe. The closest FS value to this colour is 34151 @ 2.15 rather than 34127. It is puzzling therefore why Mr Mikesh felt it necessary to create a new designation for N5 as A/N 34 and why FS 34127 is given in comparison to it rather than 34151. The difference between the observations recorded by Fearis and Mikesh may be nothing more than the subjective perception and interpretation of the colours and fan decks in different illuminant conditions or reflect the matching to specific points on variegated surfaces.


The reference to different colour standards in 'Japanese Aircraft Interiors' - by verbal description (sometimes inconsistent), Pantone, FS and the Thorpe A/N system extended in the book (with printed colour chips) introduces unnecessary complexity to an already complex subject. In the book the printed colour chip for A/N34 is actually closer in appearance to 34258 than 34127. I can only show these various colours in juxtaposition here to let readers make their own minds up.

In his earlier 'Japanese Cockpit Interiors' (Monogram Close-Up 14 & 15, 1976) Mikesh identified the same three basic Navy cockpit interior colours as recorded by Thorpe. They are shown here for completeness. It is possible that N5 and N6 represent variants or faded examples of the same basic colour. Note that none of these colours is the same as that later identified Mikesh as another colour said to be "generally used" in Navy cockpits Munsell 2.5 GY 4/2 and N.33 (and also compared to Pantone 5743U) and in the case of "Rex" specifically cited.


I am unable to resolve these difficulties but can only report them and display the colours referred to. Further confusion arises from some earlier photography (and memories!) showing what appears to be a completely different colour inside the cockpit of # 5341 but an explanation is provided by Mr Mikesh:-

"Kawanishi Shiden-kai 5341: This airplane belongs to the National Air and Space Museum and was restored in 1994 by the Champlin Fighter Museum. Unfortunately, this airplane had been over-sprayed with green zinc chromate during one of its many cosmetic repaintings. This made it difficult to detect minor variations in the paint colors that may originally have been used. The better preserved color of the interior structure, behind components that were removed, approximated Federal Standard 34127 and A/N 34. Components that would have been sub-units and installed after this initial painting showed slight variations to the basic color. Where possible, these components were merely cleaned and waxed in order to preserve this original paint. These differences in colors are scarcely apparent in the general appearance of the cockpit."

Color photographs in 'Japanese Aircraft Interiors' show the Shiden-kai cockpit fully restored and fully re-painted in colors matched to the originals identified by Mr Mikesh.

Mr Mikesh also examined this aircraft whilst conducting colorimeter measurements on other Japanese aircraft in the NASM collection, reporting the results in Asahi Journal Vol.3 No.1 and also suggesting a general cockpit interior color again matched to FS 34127 :-

"The Kawanishi Aircraft Company delivered this George 21 to the IJN in the closing months of the war. This was a late production Shiden Kai with serial number 5341. When received by NASM it had been outdoors at Willow Grove NAS for many years, in poor condition, and void of its original exterior paint. Under NASM direction, the Champlin Fighter Museum undertook its total restoration which was completed in November 1994. Traces of green paint that were found verified that its original color was N1. The interior had sufficient traces of original paint that a match could be made. Many cockpit components of similar greens have been retained with their original paint with a protective wax coating. All finishes used were semigloss."

It seems reasonable to conclude from this that the Shiden-kai cockpit interior, even late in the war, was painted rather than unpainted.

Image credits: Rendered colour chips © 2010 Straggler

Sunday, 15 September 2013

Val's Rear Seat


For anyone contemplating a build of the Aichi D3A1 in 1/72nd scale some extra detail in the cockpit interior will probably factor as a consideration, especially if the canopy is to be displayed in an open configuration. The brief review of the Dragon kit deliberately omitted reference to the observer's seat  as its unusual configuration warranted a more detailed treatment. All three (+1) available kits in 1/72nd scale provide only a seat for the observer and none of them depicts it correctly or completely. One has to look to the Hasegawa 1/48th scale kit for a presentation that more closely replicates not just the original seat but the complex seat mounting arrangement too - albeit in simplified form. There is a drawing of the seat mechanism in FAOW 130 taken from the engineering manual but viewed in line art profile it is a little difficult to work out what is going on. There is also a cutaway drawing in the same reference but unfortunately it does not show the seat arrangement clearly.   


The Airfix kit has identical pilot and observer seats which bear no resemblance whatsoever to the originals, being merely supports for the Biggles Twins. By cutting them down, the addition of plastic card and re-shaping they can be made to better approximate the real seats but if the builder of the Airfix kit wants even a representative interior a lot of additional work lies ahead. As noted elsewhere the Dragon kit features incorrectly identical seats for the pilot and observer with the latter supported directly on the floor of the cockpit without any representation of the framework around the seat. The Fujimi seat is a better shape and unlike the Dragon kit it differs correctly from the pilot's seat. However it is also mounted directly onto the cockpit floor so will again need the fabrication of a representative support cradle. For those curious about the ZTS Plastyk kit there is an in-box review here. It is a clone of the Fujimi kit. Rather curiously the Airfix and Dragon kits do not contain a machine gun for the observer although they are shown deployed on the box art. The Fujimi kit contains a nicely moulded gun but no mounting provision and it is marked 'not for use' and not shown on the instructions! A suitable gun could be pinched from other kits or there are some aftermarket white metal and resin replacements available intermittently.


The Maru Mechanic schematic for the interior (shown above) also simplifies the framework around the observer's seat into a rigid construction (it was not) and there are other details which are crudely or incorrectly depicted. The observer's seat was a bucket type, slightly smaller than the pilot's seat and with the seat pan designed to hold the parachute pack. It was supported on a transverse bar between two vertical hydraulic arms fixed to the cockpit sides on pivoting locking brackets, so there was no attachment to the cockpit floor beneath the seat. The seat could be swivelled through 180° on a central spindle on the transverse bar to face the rear. The hydraulic supporting arms could be compressed to raise the seat from the lower front facing position to the higher firing position and unlocked to allow them (and the seat) to swing rearwards in order for the observer to raise his gun to the near vertical if required. The gun mounting itself was on a 'Y' yoke from the top of each hydraulic arm to a single central support fixed to the cockpit floor behind the seat. This central support had an articulated bar on which the observer placed his feet. The whole arrangement formed a kind of tubular cradle around the seat that none of the 1/72nd scale kits has attempted to replicate. For those modellers who do not have access to a 1/48th scale Hasegawa kit the instructions (shown below) may help in visualising how the seat was actually supported (together with other missing cockpit details from the 1/72 kits).


When not in use the machine gun was stored vertically on the left side of the cockpit as shown in the Hasegawa instructions. To go into action the observer had to open his canopy, raise and turn his seat, unlock the arms to allow the seat to swing then mount and arm the machine gun. The rear machine gun in the D3A1 was the Navy Type 92 7.7mm flexible machine gun, a license-built variant of the British BSA built Lewis type light machine gun so guns of that type could also be used for a 1/72 model.

Interior Colours

Airfix suggest an unlikely combination of Humbrol paints with matt black (33) for the cockpit "floor" (actually the bottom of the fuselage) and matt middle blue (89) - Maru Mechanic inspired? - for the cockpit sides with matt aluminium (56) for the seats. Fujimi suggest "Gunze"/GSI Creos paints gray (H22) for the two seats and "metallic blue green" (H63), presumably aotake, for the rest of the interior. The seriously flawed Dragon instructions provide no suggestions at all for the interior colours. The Hasegawa 1/48th scale kit suggests a mix of "Gunze"/GSI Creos paints - 70% yellow (H4/4) + 15% green (H6/6) + 15% brown (H7/7) to make "yellow green". I have not tried this but envisage it would result in a "light olive green" (Thorpe's N5 approx. FS 34151) or "buff green" (Thorpe's N6 approx FS 14255) similar to the much touted "Nakajima interior green" paint colour. Robert C Mikesh (Japanese Aircraft Interiors 1940-1945, Monogram Aviation Publications, 2000) also reports a "yellowish green" interior colour which he unaccountably compares to (Thorpe's) N2 - a dark green.

Thorpe N5 Light Olive Green and N6 Buff Green

The FAOW cutaway depicts a pale green - similar to the Tamiya XF-71 IJN cockpit green colour. There are artifacts knocking about which show colours ranging from a light apple green, through a slightly blueish green to a definite olive green. Some further colour notes may be found here and here.


Image credits: Header painting © circa 1970 Bandai; Kit seat comparison image author; Kit Instructions: © 2002 Hasegawa Corporation; Others web.

Sunday, 22 June 2008

Zero Interior Colours


Questions about Zero interior colours are regularly asked  so I thought it would be useful to post the information here as a permanent reference. There were variations of course but this is a basic summary.

The Mitsubishi colour was typically an olive green measured as Munsell 10 Y 4/4. The closest FS equivalent is 34151 which is not quite yellow enough. This colour is identical to Thorpe's N5 'Light Olive Green' and is identified as colour AN34 by Robert C Mikesh in his 'Japanese Aircraft Interiors 1940-1945' (Monogram Aviation Publications, 2000). Curiously it is similar to the Army colour #29 'Ki Midori Iro' (Yellow green colour) seen in the cockpits of some Nakajima Army aircraft like the Type 1 fighter. 

The Nakajima colour was a slightly greyish green measured as 2.5 GY 4/2. The closest FS equivalent is 34097 which is too green and not quite grey enough. This colour is identified as N33 in the Mikesh book. There is no direct Thorpe equivalent, the nearest being N4 Light Grey Green which is 7.5 GY 5/2, the closest FS equivalent to which is 34226.  This is like a faded version of N33 and is also an interior colour identified in his earlier 'Japanese Cockpit Interiors' (Monogram Aviation Publications, 1977).

Thorpe identified another interior colour as N6 Buff Green, measured as 7.5 Y 5/4, the closest FS equivalent to which is 14255 (a little too dark). This colour is also included in the earlier Mikesh book but is not mentioned in connection with the Zero or identified in the later book. This Buff Green is often cited as the Nakajima interior colour and indeed the White Ensign Models Colourcoats paint ACJ004 'Nakajima Interior Grey-Green' is more like this colour than N33.

Mr Mikesh identified a brush painted tan colour measured as 3.2 Y 7.6/3.5 as being seen in the cockpits of two A6M3 aircraft, a Model 32 and 22, the closest FS equivalent being 33578. This colour is identified as N38 in the later Mikesh book. Ichiro Hasegawa has also reported a matt yellow, similar to this colour, as being seen in the cockpit of an A6M2 aircraft. Important Update: Ryan Toews has since provided further observations and an update about this colour, posted here.

With appreciation and thanks to Ken Glass for kindly providing the sRGB values for the fractional Munsell notations. Further interior colours specific to individual Mitsubishi and Nakajima aircraft may be found here and here.


Sunday, 21 April 2013

An Elegant Fighter Twin - Calin Ungureanu's 1/72nd scale Mitsubishi Ki-83


Continuing a season of IJAAF twins it is both a privilege and delight to be able to present here images of the MPM 1/72nd scale Mitsubishi Ki-83 built by Calin Ungureanu together with his own account of the project. Calin has a blog with images of other superb models he has made, including a Mitsubishi J2M Raiden and also a photo archive of aircraft models. As an aircraft type I hope to examine the Ki-83 in greater detail in due course.

"When I started my Japanese plane collection I never dreamed that it would include this type. But thanks to MPM who aceepted the "risk” of producing this kit in 1/72 scale and to a friend of mine who gave it to me as a Christmass present, I found myself in a position of looking for documentation. There were only four preproduction airframes built for the Imperial Japanese Army who had started testing two of them when on 15 August 1945 Japan surrendered to the Allies. The USAF officials and aeronautical engineers proceeded to test them after the war and were impressed both by the speed of the aircraft and it’s fire power capacity - 4 cannons located in the nose (2 x 20mm and 2 x 30mm)."


Building the MPM Kit


The kit is short run and I belive it’s now out of production.* This meant a lot of work was necesary to make it look acceptable. The cockpit interior is provided with just a few parts, with scarce details. Assembly indications for the cockpit lateral consoles are wrong. They must be assembled with each console re-positioned on the other side of the cockpit to that shown. The console with the oblique forward panel must be located on the right side of the pilot's seat. The observer's position in the  centre fuselage is even more sparse, but due to the small windows in this area there is not much to be seen after closing the fuselage. MPM provides clear plastic parts for the dorsal and side windows, but they are barely transparent and had to be dry-fitted and adjusted several times. With all that I ended up cracking one fuselage half by forcing one of the windows. 


For the dorsal and ventral windows I used the kit parts after polishing and soaking them in Future (Klear). For the smaller lateral windows I opted to use cristal clear. Careful attention is needed as the plastic is thick in that area and if you put a big quantity of liquid glass, it will become foggy. Applying small succesive drops is advisable, respecting their curing times. An adhesive band on the exterior and pouring the glass from the inside will help.

After constructing the kit supplied cockpit I wasn’t happy at all so I decided to replace it and scratch built the interior following pictures in Famous Aircraft of the World,  first series, no.76: Japanese Army Experimental Fighters (1) (Bunrin-Do Co. Ltd., Tokyo, Japan, August 1976). This involved making a resin copy of an Italeri F4F Corsair cockpit, which was narrowed by removing a longitudinal median segment. The pilot's seat was made from an Italeri Ju 87 seat suitably modified. Seat belts were made from Tamiya tape and a control stick from a plastic rod. 


I couldn’t find a photoetch set for this kit on the market so for the control panel I used a computer rendered image printed on a piece of paper, then cut out and glued in place on the plastic piece provided in the box. The same image was then printed on cardboard, and all the instruments removed with a punch and die set. This cardboard was then glued onto the first with white glue. In the holes I applied gloss varnish to represent the glass.  The interior was painted in Mitsubishi Interior Green with consoles and other details enhanced by a wash of brown and black ink diluted in Future. This was followed by gentle drybrushing with an ochre-green oil color. 


For the nose light I rounded the given opening and fasten a transparent bar that I then sanded close to the fuselage form and then I polished it with progressively finer wet sandpaper and in the end a fine nail polisher. The canopy was immersed in future floor polish and masked, then secured in place with PVA glue. 

Wings


The trailing edge of the wings was too thick so I scraped the interior with a scalpel blade and dry-fitted several times to conform. For the position lights I removed the kit’s plastic and glued transparent pieces that were sanded flush to the wing. Light bulbs were made by drilling holes on the inner side and filling with corresponding metalized colors (blue and red).  


Due to the fact that no tabs were provided for the wings to fuselage joints I used some plastic rod to make some kind of struts. 


The landing gear doors were enhanced with an internal panel made from sheet styrene and drilled according to documentation. Landing gear struts received brake cables.


The interior of the landing gear bays were painted with Mitsubishi Interior Green and then masked with wet tisue paper. 


Comparing to pictures I noticed that propellers blades were too broad so I sanded them to correspond in shape. 


I painted the propellers with my equivalent for the japanese propeller brown (I’m not so sure if this one is ok).


Tail


I found no mark on the fuselage to align the fin and rudder (a separate part) so it was by measurement work. Tailplanes were then aligned to the fin and elevator actuators made from scratch.

For me the most important part of building a kit is the painting. You will be familiar with the quest for the true IJA-IJN colours. After much reading and balancing of opinion and evidence, benefiting (I think) from my profession (a restorer of paintings) I arrived at some conclusions and manufactured a set of my own paints. For these I used visual and written information from this blog, the White Ensign Models range, Arawasi site and magazines, The Samurai’s Wings (Army) – A modellers guide to the colour schemes and markings of IJAAF by Peter J Fearis (Visual Media Services, Titchfield, 1999) Jim Lansdale's research on J-aircraft and other sources. The raw paint material used were automotive solvent based acrylic colours from the RAL range, which I combined to obtain colours as close as I could to the originals. I have to say that it was a customized range which contained names such as “Magirus stone gray” and “Bedford service red” followed by a code. I did this for economic reasons and also because I wanted to have a consistency in my japanese airplanes collection. On the other hand the quality of materials is the best. The finish is semigloss, it can be masked with anything and the drying time is a matter of seconds. Now this range of paints is no longer imported into my country but I have secured a sufficient amount for myself, to complete all I have to do.


First of all most of the airframe was sprayed with aluminium in preparation for the later chipping. IFF markings on the leading edge of wings were painted a deep yellow and after drying masked off. 


The lower parts of the aircraft were sprayed with pale gray obtained from RAL Mercedes range Papyrusweis 9717 (which in the general RAL range is close but a bit lighter than RAL 7035 lichtgrau) lightened with white for scale reasons. 


After masking, the top parts received the IJA olive green. This color was obtained from RAL 6003 Olivgrun which I consider was close to the original color but darker. So this paint was toned down with a light gray color making it a bit lighter than the original, again for scale reasons. The upper color was then sanded with very fine grade, wet sandpaper in certain spots, mainly on the middle section of wings and on some fuselage acces panels, following the photographic documentation.

The gloss finish of the paint was ok for a wash to be applied without any intermediate laquer.


 Looking at the photographs, I came to the conclusion that some parts of the airplane were repainted with the same colour as the original at some point. The slight variation in shine and intensity being made by the difference with the previously weathered paint. I tried to follow as closely as possible the pattern of those differences, to replicate the airplane's appearance at the time just before American intervention.


After installing the final parts, the model was completed using the decals provided which were good in colour and film quality, and conformed well to the semigloss surface. The entire model then received ta fine layer of semigloss varnish to reduce harsh contrasts in reflectivity. Regarding scale effect, I was among the group of modellers that considered that to be a myth. That was until I had occasion to dig out a wrecked He 111. I took some pieces with well preserved paint and matched the two tones with new paints. When I used those paints (RLM 70 and 71) the result on a 1/72nd scale model was almost black, with demarcation between the two tones hard to see.


An interesting feature for those modellers who might choose to represent the plane in US markings is that at this stage the landing gear compass of the left leg was probably dismantled and ended up on the front side."

*The original MPM kit was subsequently re-issued by Special Hobby as a "high tech" release with photo-etched and resin parts but it now seems difficult to find either version.

Image credits: All © 2013 Calin Ungureanu


Thursday, 12 November 2009

Useful Colours ~ Army Interiors Part Two


After running the first part of this series a couple of beautifully made big scale Ki-44 models have appeared built as on-line and magazine reviews where the primary source evidence from the 'Rikugun kokuki tosou kitei' is disregarded in favour of opinion and/or the ubiquitous internet research. This resulted in the cockpits being painted in a beautiful metallic blue ersatz 'aotake' in one case and a home-brewed bright apple green in another (based on a verbal description of colour from the memory of someone about a different type of aircraft). Lovely to look at these colours and again no problem whatsoever with the personal choice. But big problems with the fact that they were being promoted as any kind of informed choice - other than that of the "nobody really knows" type.

The requirement to paint cockpits dark blue-grey lasted until mid-1943 whilst the Type 2 was being manufactured (in all forms, including prototype) from August 1940 to January 1945. There is a clue therefore that a goodly proportion of the type up to and including mid-production were probably finished to comply with the requirements. This takes the possibility of a dark blue-grey interior into the realms of the coded serials batch 1271-1309 manufactured during June 1943.

The revised 'Rikugun kokuki tosou kitei' (Army aircraft painting regulations) of 14th June 1944 ordered the use of JAAF paint standard colour # 7 Ohryoku nana go shoku (黄緑七号色 - yellow green no.7 colour) for the painting of the upper surfaces of all Army aircraft including the cockpit interior and drop tanks. It also discontinued the requirement for the dark blue-grey and 'aotake' primer on other internal parts of the airframe in the interests of expediency. These instructions were not implemented immediately and factory painting of most types did not begin until August or September 1944, and even October for the Hayate production lines.

'Ohryoku nana go shoku' is perhaps one of the least understood and potentially most confusing of the JAAF paint colour standards, even causing a long puzzled Shigeru Nohara to state his preference for describing it as "dark khaki brown" - and ignoring the official designation - in his recent monograph on the Ki-44. In the past it has also been referred to as "late war brown", "deep brown green" and "Homeland defence khaki" - all intended to be one and the same colour - or perhaps more accurately the same colour standard. These descriptions tend to conceal the strong olive green chroma that was prevalent in the colour standard, although the procured and applied paint varied as we may see. In practice the permitted range of this colour imitated US Olive Drab but is perhaps best described as an olive brown, extending from a deep brownish olive green to a drab khaki brown. In colour terms the range is from Munsell 2.5 Y 3/2 to 7.5 Y 3/3. The closest FS 595b equivalent to both these values is conveniently 33070, @ 4.69 for the "brown" 2.5 Y 3/2 and 2.37 for 7.5 Y 3/3 (the slightly different readings above relate to the difference calculation between the respective pure sRGB values). Therefore this FS value is biased towards the greenish end of the range and 33070 is not quite brown enough for the brown end of the range. The bright orange and reddish browns that appear on some models (and profiles) intended to replicate this "late war brown" are largely flights of fantasy.

Conducting an online search for yellow-green colour (黄緑色) in Japanese language clarifies Nohara-san's confusion, because it will bring up many images of what can be described as a pea green colour - a strongly yellowish green. These are similar to the sickly yellow greens of JAAF # 29 yellow green colour (also 黄緑色 but often romanised as ki midori iro). This potential confusion may explain the qualifier No.7 (七号) always used to differentiate the olive brown colour.

Extant artifacts and paint surface colour measurements confirm that # 7 was applied inside cockpits on several types (such as the Ki-45 and Ki-67). However, whether there was some confusion in the understanding and implementation of this order or in its intention, another JAAF  # 29 yellow green is also found inside the cockpits of Nakajima Ki-43, Ki-44 and possibly other aircraft, particularly during the mid-war period (so the practice might have preceeded the June 1944 instruction). The measurement of one example of yellow green from the interior of Hayabusa 5227 matches this colour almost exactly. The closest Munsell equivalent is 10 Y 4/4 and the closest FS 595b match to that is 34151 @ 2.15 (but not quite yellow or chromatically strong enough). Curiously the latter FS value has also been cited in respect of Mitsubishi-built Zero cockpit interiors. This interior colour has been described variously (primarily in Hayabusa cockpits) as a "Nile green", "sickly green","yellowish olive green" and "bilious green". A dull and weathered version may be the basis for the "khaki green" suggested by Hasegawa for its 1/32nd Shoki model but there is no way of knowing if this suggestion is for a variation of # 7 (and I have not checked out the hobby paint colour cited). Early 1960's representations of a distinctive "oily green" finish on the cockpit, wheel wells and the inner faces of the undercarriage doors on Shoki may be attempts to depict variants of # 29.

A recent theory supposedly emerging from Japan, that during the early period of the war Army cockpits may have reverted to an aotake finish  (青竹色 - literally blue green bamboo colour - or sometimes written as 淡青色透明 - literally thin, translucent, light blue colour), seems to be based upon the evidence of paint colour in the restoration of surviving Hayabusa s/n 750. The available documentation about the restoration (excerpted below) is somewhat ambiguous and, bearing in mind the official instructions and previous comments about how degraded examples of # 3 can appear to the eye and not taking single examples as proof of a standard methodology, this theory seems a little tenuous.

"A full surface corrosion removal (of Hayabusa s/n 750) was undertaken. Fortunately corrosion had not got a good hold on this aircraft and most was buffed off using Scotchbrite buffing wheels. The wash also brought the internal corrosion proof paint up beautifully. The colours inside now were brilliant green with some blue panels, and where it had not been exposed to ultra violet light, had proven itself to be extremely effective in its performance. The interior skins were remarkably well preserved. We were able to duplicate the colours fairly accurately and decided that a deoxidene and alodeine wash would be appropriate before any new paint application to ensure future preservation of the original skins. Later in the year areas which did show surface corrosion were buffed to remove corrosion and the above washes were applied before the final paint." 


"Inside the flap bays, the corrosion inhibitor again had served the Oscar well, the translucent green protecting against deterioration and this required no rework at all apart from cleaning. It is of interest to note that internal skins inspected were hand numbered 750, from time of manufacture as were the fuel tank bays. "


Gakken 52 on the Hayabusa states that whilst the prototype and pre-production versions of the Ki-43 had the cockpit interior finished in ash indigo colour, (hai ran shoku or hai ai iro 灰藍色) the production aircraft had the whole interior, including the cockpits and wheel wells, finished in aotake.

Majoring on the Ki-44 for the time being, which seems to be the flavour of the month, we do have some interior photographs to consider. The cockpit photographs of s/n 2143, captured at Clark (and manufactured during October 1944), are fairly well known, but a new Japanese photograph, of the port side of the cockpit of another Ki-44 with the pilot's gloved hand on the throttle, appears on page 33 of Scale Aviation # 70 (Nov 2009). Now, I am not about to attempt that dark and fallacious art of interpreting colour from monochrome photographs, but at least the paint surface may be seen to be darkish in tone and opaque in character with the usual chips and scratches suggestive of a conventional paint finish subjected to the trials and tribulations of service use. There is not the barest hint of the brightly reflective, translucent, metallic-looking surface finish suggested by the restorations of Hayabusa s/n 750 or the NASM J1N1-S Irving.

My penchant for believing in the viability of early references, in preference to some of the revisionist and opinionated twaddle aired on the 'net these days, is well known - and well scorned. But the fact remains that in the thirty years period after the war there were very many more people around who had actually lived and worked up close with the equipment we now ponder. They were not grizzled ancients either, but men and women in their prime, and they were more accessible then than now, still being of working age and to be found in establishments and institutions throughout society, and able and mostly very willing to answer questions - if and when asked. I'm not suggesting that all references in this time period should be viewed without question or accepted unchallenged without the confirmation of other evidence, but I do believe it is equally wrong to treat them all as somehow primitive and unreliable. That being offered in Maru's 1978 painting of the Shoki interior depicts an opaque green of somewhat indeterminate character, a true 'aotake' in the early understanding of that colour as a "fresh bamboo green" opaque paint. The colour is not quite yellow or bilious enough for # 29, or olive and brown enough for # 7, but I would have no hesitation in using it as the basis for painting a Shoki cockpit. In fact my own pecking order, included for interest rather than mandated in any way, would be as follows:-

1. Dark blue-grey, # 3, for early and mid-production examples
2. Yellowish olive green, # 29 for mid-production to late-production examples
3. Olive drab, # 7, for late production examples
4. Translucent yellow-green aotake as a possibility on some mid-war examples.
5. Blue aotake.

The last part of this series will explore the colours specific to Kawasaki manufactured aircraft.

Image Credit: Rendered colour chips ©2009 'Straggler'

Tuesday, 8 September 2020

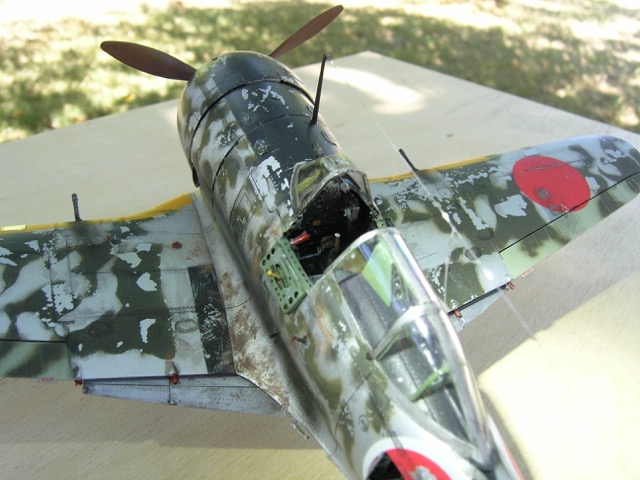
More Shoki! A Big Scale Ki-44 by Kevin Burke


Kevin Burke has very kindly shared these images and build details of his impressive Nakajima Ki-44-I 'Shoki' model built from the Hasegawa 1/32 scale kit and representing a well-used fighter-trainer in classic Akeno Army Flying School scheme. This is Kevin's first model after a 30 year absence from modelling!  Over to Kevin then:-


'Beautiful clean, flash free hard plastic moldings secured on bagged trees. This model had the telescopic sight so the front windscreen would be unique to this model. Straight forward construction was enhanced with the Eduard interior and exterior sets for the Ki-44. These are beautiful and the interior kit is worth the cost just for the pilot seat itself.


'Vallejo paints were used for the interior colours and exterior mottling. I added the shoulder harness from the Eduard interior set, some say the IJA did not have shoulder harness, I say, why not, and added it anyway. Seat is very accurate and in scale. Most interior parts were broken into sub-assemblies and added in time. Engine was constructed and wiring was added from Eduard, after closing the fuselage up, it is not viewable.


'Both side entry doors were sawn open and Eduard parts added and painted, but the doors left off until all painting was completed. I decided to open the radio compartment and add radio detail. I cut the opening but really ruined the hatch so I heated up sheet plastic and draped it over the fuselage area involved, trimmed to the proper shape for the hatch and added panel detail. Radio information was gathered on line and a  scale transmitter/receiver was scratch-built from plastic bits and a Waldron Punch-set.. The interior was painted and cockpit components added along with radio, wiring and frame work. The mating of the fuselage to the wing section was amazing, almost not needing any cement as it was so accurately tight.


'Very little putty was needed  on the exterior of the model. Once most parts were attached and smoothed out a primer coat was applied. I used, believe it or not, Model Master 'non buffing' aluminum out of their spray can and found it an excellent cover. Why use this?  I knew it would set up hard and allow me to lift paint chips off the model, retaining the aluminum base. Following the painting instructions mottling was added. This took several tries with my older Paasche H single stage airbrush. Old doesn’t mean bad - just old.


'Once painting was complete, (Micro-Gloss, decaling),  I chipped the model using painting tape and applying it then lifting off, forming actual removal of paint chips. That was the reason for the Model Master lacquer base and it worked. Scrapes and muddy boot prints were added to the wing areas. Hand/foot grabs added along with canopy handles. Aerials were stretched sprue with white glue insulators. Micro-Flat sprayed overall. Exhaust was black Tamiya, diluted with white and then a light gray overspray. Chalks were brushed on.


'Aber wing machine guns were added and residue brushed on. Oil and panel lines were Tamiya panel line accent.  Much enjoyment in those boxes. The only problem I encountered was the weak tail wheel breaking twice - my fault - and that crazy two-piece telescopic sight through the windscreen. My first kit after 30 years but it won’t be my last. Hasegawa has made an excellent kit!'


With very special thanks to Kevin for sharing these images and details of his stunning Shoki model.

Image credit: All model photos © 2020 Kevin Burke; radio photograph via Kevin Burke